Persisting IoT Device Messages into CosmosDB with Azure Functions and IoT Hub

If you are doing IoT, you are generating data. Maybe even lots of data. If you are doing API calls on each device to store them directly, you are doing yourself a disservice. If you are using something different as an event handler, things are better. If you are like me, you’re using Azure IoT Hub to ingest the events.

IoT Hub

IoT Hub is a great way to ingress data from thousands of devices without having to create a scalable API to handle all of them. Since you don’t know if you will be receiving one event per hour or 1000 events per seconds, you need a way to gather all this. However, those are just messages.

You want to be able to store all your events efficiently whether it’s 100 events or a billion.

Azure Functions ⚡

You could always spawn a VM or even create an App Service application and have jobs dequeue all those messages. There’s only one issue. What happens when your devices stop sending events? Maybe you’re running a manufacturing company that only operates 12 hours a day. What happens during those other 12 hours? You are paying for unused compute. What happens to the week where things need to run 15 hours instead of 12? More manual operations.

That’s where serverless becomes a godsend. What if I tell you that you’d only pay for what you use? No usage, no charge. In fact, Azure Functions comes in with 1 million execution for free. Yes, single function execution. You pay pennies per million executions.

Azure Functions is the perfect compute construct for use in IoT development. It allows you to bring in massive compute power only when you need it.

Storing the events

We have our two building blocks in place. IoT Hub to ingest event, Azure Functions to process them. Now the question remains where do I store them?

I have two choices that I prefer.

Now let’s assume a format of messages that are sent to our IoT Hub. That will serve as a basis for storing our events.

1
2
3
4
5
6
7
8
9
10
11
{
"machine": {
"temperature": 22.742372309203436,
"pressure": 1.198498111175075
}
,

"ambient": {
"temperature": 20.854139449705436,
"humidity": 25
}
,

"timeCreated": "2022-02-15T16:27:05.7259272Z"
}

CosmosDB

CosmosDB allows you to store a massive amount of data in a geo-distributed way without flinching under load. Besides its different consistency model and multiple APIs, it is a fantastic way to store IoT events and still be able to query them easily.

So let’s assume we receive the previously defined message through an Azure Function.

Let’s create our Function. We’ll be using the CSX model that doesn’t require Visual Studio to deploy. We can copy/paste directly this code in the portal.

1
2
3
4
5
6
7
8
9
10
#r "Newtonsoft.Json"

using System;
using Newtonsoft.Json.Linq;

public static void Run(string myIoTHubMessage, out object outDocument, TraceWriter log)
{

dynamic msg = JObject.Parse(myIoTHubMessage);
outDocument = new {timeCreated = msg.timeCreated, temperature = msg.machine.temperature};
}

Inputs

Then, we need to define our inputs. This is done with the Integrate option below our function.

Azure Functions IoT Hub Inputs

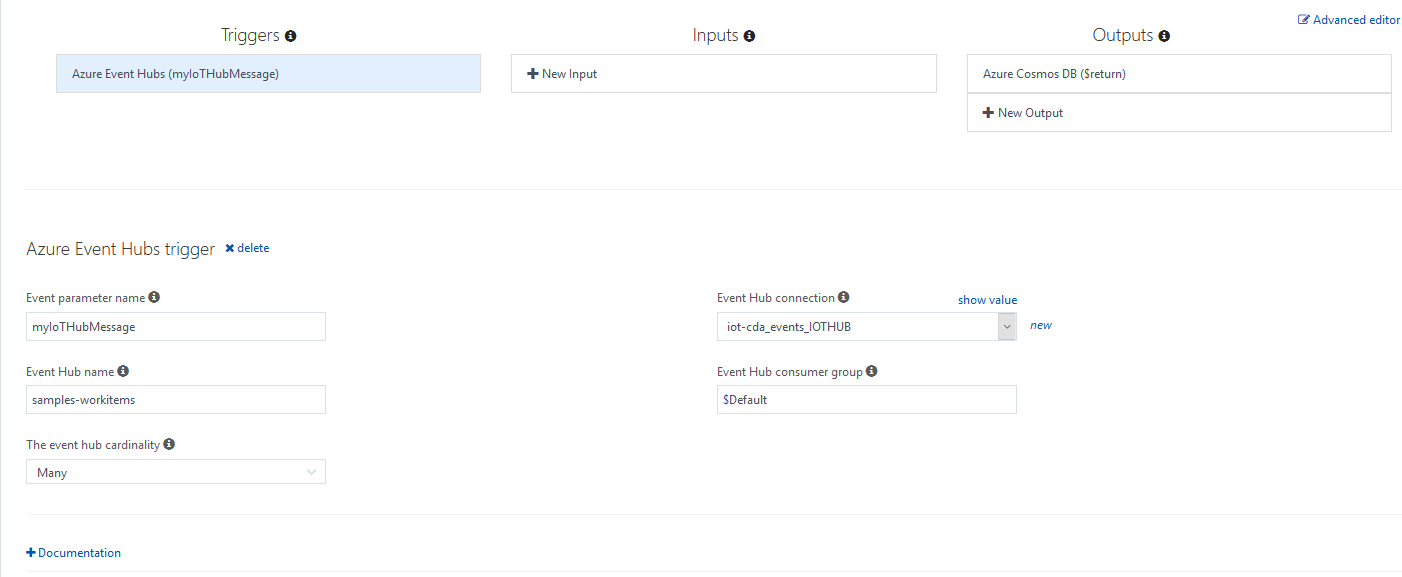
In this section, we define our function parameter that matches with our written function. I also create a new event hub connection.

Output

Now we need to define where things are going to go. In our case, I’m setting a Cosmos DB Output.

Azure Functions CosmosDB Output

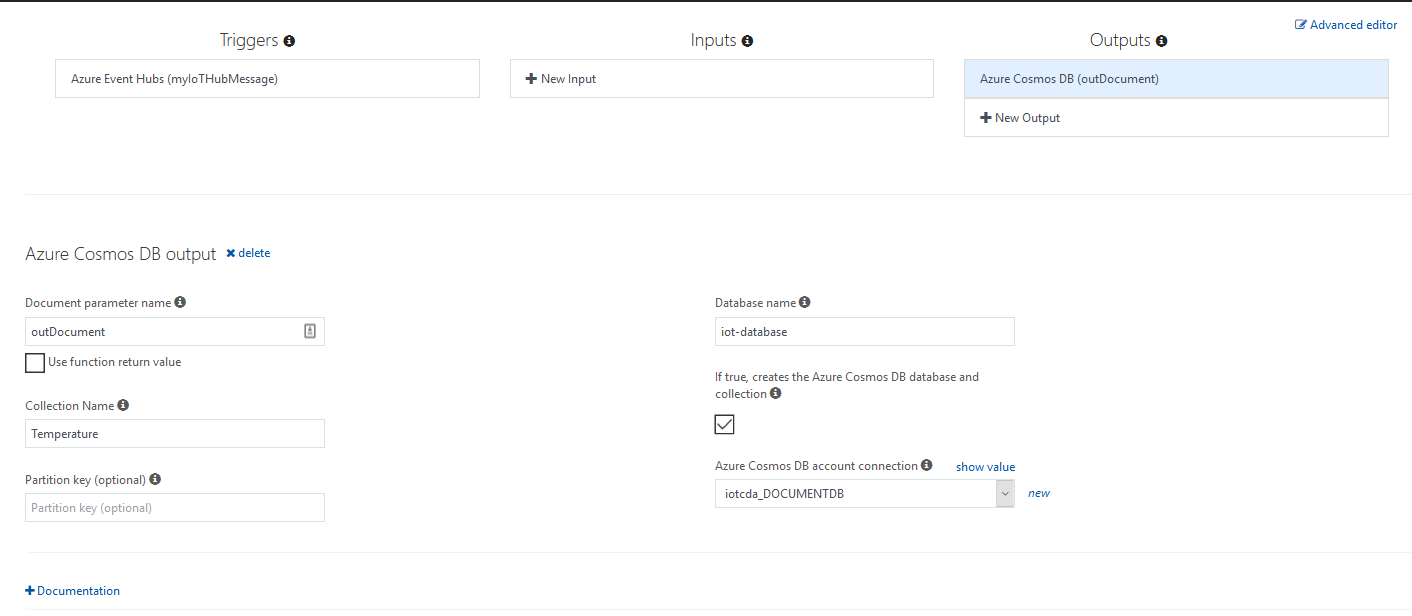
In this section, I created a new connection to my Cosmos DB account where save our messages. As you can see, if you check the right checkbox, you don’t need to create any collection or databases manually.

On Automating

As you can see, I’m being all fancy and creating everything through a Portal UI. Everything I’ve done can be replicated with an ARM Template that will allow you to provision your different resources and bind your connection strings together.

If you are interested in seeing a way to deploy this through the command line, please let me know in the comments.

Results

After everything has been hooked up together, I sent a few manual event on my IoT Hub and looked into my Cosmos DB account.
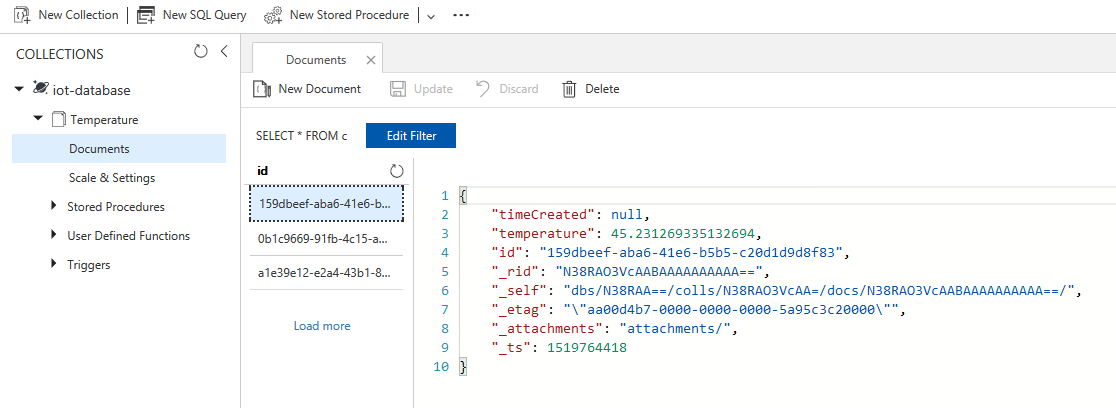
Azure Functions CosmosDB Result

Amazing!

Want more?

So what we just saw was a very cheap and scalable way to receive a ton of events from thousands of devices and store them in Cosmos DB. This will allow us to either create reports in Power BI, consume them in Machine Learning algorithms or stream them through SignalR to your administrative dashboard.

What would you be interested next? Let me know in the comment section.

GO GO Hugo Blog to Azure Storage

Previously, we saw how to serve our static site out of blob storage.

The thing is, you’d still need to generate the actual HTML on a computer with all the tools installed. Well, that’s no fun.

What if we could generate all of this dynamically?

Last time, we had a git repository with our proxies into it. Now’s the time to add the whole root of our Hugo blog project. I would add /public to our ignore file as we’ll be regenerating them anyway.

Make sure that you do not include files with passwords, keys or other valuable data.

I am using Hugo here, but any static site renderer that can run in a Windows Environment as a standalone executable or on a list of supported language will run fine.

Minimum requirements before going further

Hugo Executable

If you are going to follow this tutorial using Hugo, please make sure that you have the stand-alone executable version for Windows downloaded. Also, make sure to add it to our git repository in /tools. We should now have /tools/hugo.exe present.

AzCopy

Then, install the latest version of AzCopy. I didn’t find a way to get the newest version other than by the installer.

It installs by default under C:\Program Files (x86)\Microsoft SDKs\Azure\AzCopy. Copy all the DLLs and AzCopy.exe under our /tools folder. We’ll need it very soon.

Custom deployment in Azure

When we deploy as we did previously with an Azure hosted git repository, there are default behaviors applied to deployments. Mostly, it’s copy/pasting the content and using it as our application.

But, we can do more. We can customize it.

The first step is installing kuduscript and generate a basic deployment script.

1
2
3
npm install -g kuduscript
# generates a powershell script for custom deployment
kuduscript --basic -t posh -y

The generated deployment script is useless to us. We’ll empty it. However, I wanted you to see its content first. We could forgo kuduscript altogether because we’re just going to write our script but, it’s important to notice what this script is doing and how to generate it. It allows you to customize your whole deployment process if you ever need to do that kind of thing without a specialized tool like Visual Studio Team Services.

So, the lesson’s over. Let’s empty out that file and paste the following inside.

1
2
3
4
5
6
7
8
9
10
11
12
13
14
15
16
17
18
19
20
21
22
23
24
25
26
# Generates our blog to /public
.\tools\hugo.exe -t minimal

# Connection string associated with the blob storage. Can be input manually too.
$blobStorage = $env:AzureWebJobsStorage

# We extract the key below
$accountKey = ""
$array = $blobStorage.Split(';')
foreach($element in $array)
{
if($element.Contains('AccountKey'))
{
$accountKey = $element.Replace("AccountKey=", "")
}
}

if($accountKey -ne "")
{
# Deploy to blob storage
.\tools\AzCopy.exe /Source:.\public /Dest:https://hugoblog2.blob.core.windows.net/content /DestKey:$accountKey /SetContentType /S /Y
}
else
{
Write-Host "Unable to find Storage Account Key"
}

Let’s send this to our Azure git repository that we set earlier.

1
2
3
git add .
git commit -m "deploying awesomeness by the bucket"
git push azure master

Resulting output

As soon as you hit Enter on this last command, you should be receiving these answers from the remote:

1
remote: Updating branch 'master'.
remote: ....
remote: Updating submodules.
remote: Preparing deployment for commit id 'f3c9edc30c'.
remote: Running custom deployment command...
remote: Running deployment command...
remote: .............
remote: Started building sites ...
remote: ...................................
remote:
remote: Built site for language en:
remote: 0 draft content
remote: 0 future content
remote: 0 expired content
remote: 305 regular pages created
remote: 150 other pages created
remote: 0 non-page files copied
remote: 193 paginator pages created
remote: 0 categories created
remote: 71 tags created
remote: total in 39845 ms
remote: .......................
remote: [2017/11/09 15:16:21] Transfer summary:
remote: -----------------
remote: Total files transferred: 652
remote: Transfer successfully:   652
remote: Transfer skipped:        0
remote: Transfer failed:         0
remote: Elapsed time:            00.00:00:26
remote: Running post deployment command(s)...
remote: Syncing 0 function triggers with payload size 2 bytes successful.
remote: Deployment successful.

From that little script, we managed to move our static site content generation from your local machine to the cloud.

And that’s it. Every time you will git push azure master to this repository, the static site will be automatically generated and reuploaded to Azure Blob Storage.

Is there more we can do? Anything else you would like to see?

Let me know in the comments below!

Hosting static site for cheap on Azure with Storage and Serverless

So, I recently talked about going Static, but I didn’t talk about how to deploy it.

My favorite host is Azure. Yes, I could probably go with different hosts, but Azure is just so easy to use that I don’t see myself changing anytime soon.

What about I show you how to deploy a static site to Azure while keeping the cost at less than 1$ per months*?

*it’s less than $1 if you have a low traffic site. Something like Scott Hanselman’s blog would probably cost more to run.

Needed feature to host a blog

So to host a static blog, we need to have a few fundamental features

  • File hosting
  • Custom domain
  • Support for default file resolution (e.g., default.html or index.html)

With this shopping list in mind, let me show you how Static and Serverless can help you achieve crazy low cost.

Azure Functions (or rather, proxies)

Cost (price in USD)

Prices change. Pricing model too. Those are the numbers in USD at the time of writing.

Azure Storage is $0.03 per stored GB, $0.061 per 10,000 write operations and $0.005 per read operation. So if your blog stays under 1Gb and you get 10,000 views per months, we can assume between $0.05 and $0.10 per months in cost (CSS/JS/images).

Azure Functions provides the first 1 million execution for free. So let’s assume 3 million requests, and it would bring us to $0.49.

Big total of $0.69 for a blog or static site hosted on a custom domain.

How to deploy

Now that we have our /public content for our Hugo blog from the last post, we need to push this into Azure Storage. One of the concepts is called Blobs (Binary Large Object). Those expose content on a separate URL that looks like this: https://<StorageAccount>.blob.core.windows.net/<Container>/

So uploading our root index.html will be accessible on https://<StorageAccount>.blob.core.windows.net/<Container>/index.html. We will need to do this for ALL files in our current /public directory

So as the URL shows, we’ll need a storage account as well as the base container. The following script will create the required artifacts and upload the current folder to that URL.

1
2
3
4
5
6
7
8
az group create --name staticblog-test -l eastus
az storage account create --name hugoblog2 -g staticblog-test --sku Standard_LRS

$key = az storage account keys list -n hugoblog2 -g staticblog-test --query [0].value -o tsv
az storage container create --name content --public-access container --account-name hugoblog2 --account-key $key

cd <output directory of your static site>
az storage blob upload-batch -s . -d content --account-name hugoblog2 --account-key $key --max-connections 20

So accessing the same file on that URL will now be accessible on https://hugoblog2.blob.core.windows.net/content/index.html.

Now that we have the storage taken care of, it’s important to remember that although we can associate a custom domain to a Storage Account, the Storage account does not support default files and uploading files to root. So even if we could map it to a custom domain, we would still have the /content/index.html instead of /index.html.

So this brings us to Azure Functions.

Provision the function

So we’ll need to create a Function using the following code.

1
az functionapp create -n hugoblogapp -g staticblog-test -s hugoblog2 -c eastus2

Then, we create a proxies.json file to configure URL routing to our blob storage. WARNING: This is ugly. I mean it. Right now, it can only match by url segment (like ASP.NET MVC), and it’s not ideal. The good news is that the Azure Functions team is very receptive to feature request, and if you need something specific, ask them on Twitter or on Github.

1
2
3
4
5
6
7
8
9
10
11
12
13
14
15
16
17
18
19
20
21
22
23
24
25
26
27
28
29
30
31
32
33
{
"$schema": "http://json.schemastore.org/proxies",
"proxies": {
"root":{
"matchCondition": {"route": "/"},
"backendUri": "https://hugoblog2.blob.core.windows.net/content/index.html"
}
,

"firstlevel": {
"matchCondition": {"route": "/{level1}/"},
"backendUri": "https://hugoblog2.blob.core.windows.net/content/{level1}/index.html"
}
,

"secondlevel": {
"matchCondition": {"route": "/{level1}/{level2}/"},
"backendUri": "https://hugoblog2.blob.core.windows.net/content/{level1}/{level2}/index.html"
}
,

"thirdlevel": {
"matchCondition": {"route": "/{level1}/{level2}/{level3}/"},
"backendUri": "https://hugoblog2.blob.core.windows.net/content/{level1}/{level2}/{level3}/index.html"
}
,

"fourthlevel": {
"matchCondition": {"route": "/{level1}/{level2}/{level3}/{level4}/"},
"backendUri": "https://hugoblog2.blob.core.windows.net/content/{level1}/{level2}/{level3}/{level4}/index.html"
}
,

"css": {
"matchCondition": {"route": "/css/main.css"},
"backendUri": "https://hugoblog2.blob.core.windows.net/content/css/main.css"
}
,

"rest": {
"matchCondition": {"route": "{*restOfPath}"},
"backendUri": "https://hugoblog2.blob.core.windows.net/content/{restOfPath}"
}

}

}

Hooking git

Now, this proxies.json file is not configurable via the command line so we’ll need to create a git repository, add the file to it and deploy it using Git.

Note: You will need to set a deployment user before pushing to source control.

The script below will configure Git for our Functions app, add a remote upstream to the current git repository and push the whole repository. This will start a deployment.

1
2
3
4
az functionapp deployment source config-local-git --name hugoblogapp -g staticblog-test
$git = az functionapp deployment source config-local-git --name hugoblogapp -g staticblog-test -o tsv
git remote add azure $git
git push azure master

If your file wasn’t in there before, I’d be using Visual Studio Code to create the file, add it, commit it and push it.

1
2
3
4
code proxies.json # copy/paste the content above and change your blob url
git add .
git commit -m "adding proxies"
git push azure master

Now your proxy will automatically be picked up, and your Hugo Blog now works.

The same thing can be done with some slight modification to the proxies.

What do we have now?

We have a system where we can forward any requests to the Storage URLs.

It’s clunky for now, but it’s one way to do it with serverless. Imagine now that you want to add an API, authentication, queuing messages. All this? It is all possible from that same function.

If you are building a SaaS application, it’s an excellent option to have with the least amount of building blocks.

Future changes

Even though it’s the “minimum amount of building blocks”, I still think that it’s way too high.

The second highest uservoice that they have is about supporting complete static site without any workarounds.

Once implemented, this blog post will be unnecessary.

What next?

Thinking creatively with Azure allows you to perform some great cost saving. If you keep this mindset, Azure will become a set of building blocks on which you will build awesomeness.

Are you using static sites? Was this content useful? Let me know in the comments!

Breaking the shackles of server frameworks with static content

Let me tell you the story of my blog.

It started back in 2009. Like everyone back then, I started on Blogger as it was the easiest way to start a blog and get it hosted for free. Pretty soon, however, I wanted to have my domain and start owning my content.

That brought me down the rabbit hole of blog engines. Most engines back then were SQL based (SQL Server or MySQL) thus increasing the cost.

My first blog engine was BlogEngine.NET. After a few painful upgrade, I decided to go to something easier and more straightforward. So I went with MiniBlog by Mads Kristensen. Nothing fancy but I still had some issues that left me wanting to change yet again.

So this led me to think. What were the features in those blog engine that I used? I sure wasn’t using the multi-user support. I’m blogging alone. As for the comments, I was using Disqus for years now due to centralized spam management. What I was using was pushing HTML and having it published.

That’s a concise list of features. I asked the question… “Why am I using .NET?”. Don’t get me wrong; I love .NET (and the new Core). But did I NEED .NET for this? I was just serving HTML/JS/CSS.

If I removed the .NET component what would happen?

Advantages of no server components

First, I don’t have to deal with any security to protect my database or the framework. In my case, .NET is pretty secure, and I kept it up to date but what about a PHP backend? What about Ruby? Are you and your hoster applying all the patches? It’s unsettling to think about that.

Second, it doesn’t matter how I generate my blog. I could be using FoxPro from a Windows XP VM to create the HTML, and it would work. It doesn’t matter if the framework/language is dead because it’s not exposed. Talk about having options.

Third, it doesn’t matter where I host it. I could host it on a single Raspberry PI or a cluster, and it would still work.

Finally, it makes changing platform or language easier. Are you a Node fan today? Use Hexojs just like I did. Rather use Ruby? Jekyll is for you. Want to go with Go instead? Try Hugo.

That’s what this blog post is about. It doesn’t matter what you use. All the engines all use the same files (mostly).

Getting started

First, I’ll take a copy of my blog. You could use yours if it’s already in markdown, but it’s just going to be an example anyway. Mine uses Hexojs. It doesn’t matter unless you want to keep the template.

What is important are all the markdown files inside the folder /source/_posts/.

I’ll clone my blog like so.

1
git clone https://github.com/MaximRouiller/blog.decayingcode.com

What we’re going to do is generate a script to convert them over to two different engine in very different languages.

Impossible? A week-long job? Not even.

Here are our goals.

I’m not especially attached to my template, so I exclude that from the conversion.

Also to take a note, images haven’t been transitioned, but it would be a simple task to do.

Wyam Reboot

First, you’ll need to install Wyam’s latest release.

I went with the zip file and extracted the content to c:\tools\wyam.

1
2
3
4
5
6
7
8
9
10
11
12
13
14
15
16
17
18
19
20
21
22
23
24
25
26
27
28
# I don't want to retype the type so I'm temporarily adding it to my PowerShell Path
$env:Path += ";c:\tools\wyam";

# Let's create our blog
mkdir wyam-blog
cd wyam-blog
wyam.exe new --recipe blog

# Wyam create an initial markdown file. Let's remove that.
del .\input\posts\*.md

# Copying all the markdown files to the Wyam repository
cp ..\blog.decayingcode.com\source\_posts\*.md .\input\posts

# Markdown doesn't understand "date: " attribute so I change it to "Published: "
$mdFiles = Get-ChildItem .\input\posts *.md -rec
foreach ($file in $mdFiles)
{
(Get-Content $file.PSPath) |
Foreach-Object { $_ -replace "date: ", "Published: " } |
Set-Content $file.PSPath
}

# Generating the blog itself.
wyam.exe --recipe Blog --theme CleanBlog

# Wyam doesn't come with an http server so we need to use something else to serve static files. Here I use the simple Node `http-server` package.
http-server .\output\

Sample URL: http://localhost:8080/posts/fastest-way-to-create-an-azure-service-fabric-cluster-in-minutes
My blog in Wyam

Hugo Reboot

First, you’ll need to install Hugo.

Then select a theme. I went with the Minimal theme.

1
2
3
4
5
6
7
8
9
10
11
12
13
14
15
16
17
18
19
20
21
22
23
# Create a new hugo site and navigate to the directory
hugo new site hugo-blog
cd hugo-blog

# we want thing to be source controlled to create submodules
git init

# selecting my theme
git submodule add https://github.com/calintat/minimal.git themes/minimal
git submodule init
git submodule update

# overwrite the default site configuration
cp .\themes\minimal\exampleSite\config.toml .\config.toml

# create the right directory for posts
mkdir .\content\post

# Copying all the markdown files to the Hugo repository
cp ..\blog.decayingcode.com\source\_posts\*.md .\content\post

# generate the site with the selected theme and serve it
hugo server -t minimal

Sample URL: http://localhost:1313/post/fastest-way-to-create-an-azure-service-fabric-cluster-in-minutes/

My blog in Hugo

Result

So how long did it take me? Hours? No. In fact, it took me longer to write this blog post relating the events than doing the actual conversion.

Why should I care about your blog?

Well, you shouldn’t. The blog is an excuse to talk about static content.

Throughout our careers, we often get stuck using comfortable patterns and solutions for the problems we encounter. Sometimes, it’s useful to disconnect ourselves from our hammers to stop seeing nails everywhere.

Now. Let’s forget about blogs and take a look at your current project. Does everything need to be dynamic? I’m not just talking HTML here. I’m also talking JSON, XML, etc.

Do you need to have your data regenerated every time?

What can be transformed from a dynamic pipeline running onto a language full of features and execution path to a simple IO operation?

Let me know in the comment.

Fastest way to create an Azure Service Fabric Cluster in minutes

Previously, we found a way to create easily a self-signed certificate for Service Fabric. But did you know that all of this can be self-wrapped in a single command?

So let’s check it out.

1
az sf cluster create --resource-group demo -l eastus --name myawesomecluster --vm-user-name maxime --vm-password P@ssw0rd1! --cluster-size 3 --certificate-subject-name mycluster --certificate-password P@ssw0rd1! --certificate-output-folder .\ --vault-name myawesomevault --vault-resource-group demo

That’s bit a long… let me explode it line by line

1
2
3
4
5
6
7
az sf cluster create --resource-group demo -l eastus --name myawesomecluster 
--vm-user-name maxime --vm-password P@ssw0rd1!
--cluster-size 3
--certificate-subject-name mycluster
--certificate-password P@ssw0rd1!
--certificate-output-folder .\
--vault-name myawesomevault --vault-resource-group demo

Woah… That’s a mouthful… Let’s see. First, we’re specifying our resource group, location and name of our cluster. Do we need to create those? Oh no. It’ll be handled for you. If the resource group exist, it will use it. If it’s missing, it will create it for you. I recommend creating a new one.

VM Size? The default at the time of writing the Standard_D2_v2 which is a general purpose Virtual Machine with 2 cores and 7 GiB of memory. They are at about $240 USD per months so… if you don’t need that much, please specify a different SKU one with the flag --vm-sku. If you’re looking for something specific, check out my Azure Virtual Machine Size Browser to help you make a choice. There are cheaper choices and I will come back to that later.

Cluster Size? One if you are testing your development scenarios. I’d start with three if you are just testing some actual code. Five at a minimum if you intend to run this in production.

The certificate parameters? All essential to get to our next step. As for the vault, I’ve tried removing them and it’s non-negotiable. It needs it.

What it will do however, is enable a flag on your Key Vault that enables Virtual Machines to retrieve certificates stored in it.

Key Vault Advanced Access Policies

Finally, you’ll most definitely need a username/password. You provide them there. Oh and please pick your own password. It’s just a sample after all.

And that’s pretty much it. What’s left? Importing to certificate so that we can access our Service Fabric Explorer.

Importing the certificate in Windows

1
2
# Change the file path to the downloaded PFX. PEM file is also available.
Import-PfxCertificate -FilePath .\demo201710231222.pfx -CertStoreLocation Cert:\CurrentUser\My\

That’s it. Seriously.

One single command line.

Cleaning up

Of course, if you’re like me and don’t have a load big enough to justify multiple VMs to host your Service Fabric cluster, you may want to clean up that cluster once you’re done.

If you didn’t reuse a Resource Group but created a new one, then the clean up is very easy.

1
2
# deletes the resource group called `demo` without confirmation.
az group delete --name demo -y

Further reading

If you want to read more about Service Fabric, I’d start with some selected reading in the Microsoft Docs. Let me know if that help!

Essential Service Fabric Concepts

I’ve structured the following list of links to give you a progressive knowledge of Service Fabric.

Creating that first app and deploying it to our newly created service

Creating a secure Azure Service Fabric Cluster - Creating the self-signed certificates

Service Fabric is an amazing tools that will allow you to create highly resilient and scalable services. However, creating an instance is Azure is not an easy feat if you’re not ready for the journey.

This post is a pre-post to getting ready with Service Fabric on Azure. This is what you need to do before you even start clicking Create new resource.

Let’s get started.

Step 0 - Requirements (aka get the tooling ready)

You’ll need to install the following:

Step 1 - Explaining Service Fabric Explorer Authentication

Service Fabric will require one of many ways of authentication. The default one is to specify a certificate. You could also go with client certificates or Azure Active Directory but it would require us to run additional commands and explain other concepts.

Let’s keep this simple.

We need a certificate to create our cluster. Easy right? Well, not quite if you’re looking at the docs. The certificate need to be uploaded into a KeyVault and you need to create it BEFORE even trying to create a Secure Service Fabric Cluster.

Step 2 - Creating a KeyVault instance

You may need to run az login before going further. Ensure that your default subscription is set properly by executing az account set --subscription <Name|Id>.

Creating a KeyVault will require a Resource Group. So let’s create both right away.

1
2
3
4
5
# Create our resource group
az group create --location eastus --name rgServiceFabricCluster

# Create our KeyVault Standard instance
az keyvault create --name my-sfcluster-keyvault --location eastus --resource-group rgServiceFabricCluster --enabled-for-deployment

Alright! This should take literally less than 20 seconds. We have a KeyVault! We’re ready now. Right? Sadly no. We still need a certificate.

Step 3 - Creating a self-signed certificate into KeyVault

Now is where the everyone gets it wrong. Everyone will tell you how to generate your own certificate (don’t mix Windows, Linux, OSX) and how to upload it.

You see, I’m a man with simple taste. I like the little thing in life. Especially in the CLI.

1
2
3
4
5
6
7
8
9
10
11
# This command export the policy on file. 
az keyvault certificate get-default-policy > defaultpolicy.json

# !IMPORTANT!
# By default, PowerShell encode files in UTF-16LE. Azure CLI 2.0 doesn't support it at the time of this writing. So I can't use the file directly.
# I need to tell PowerShell to convert to a specific encoding (utf8).
$policy = Get-Content .\defaultpolicy.json
$policy | Out-File -Encoding utf8 -FilePath .\defaultpolicy.json

# This command creates a self-signed certificate.
az keyvault certificate create --vault-name my-sfcluster-keyvault -n sfcert -p `@defaultpolicy.json

Since the certificate was created, we’ll need to download it locally and add it to our Certificate Store so that we may login to our Service Fabric Cluster.

Step 4 - Download the certificate

This will download the certificate to your machine.

1
az keyvault secret download --vault-name my-sfcluster-keyvault -n sfcert -e base64 -f sfcert.pfx

You now have the file sfcert.pfx on your local machine.

Step 5 - Installing the certificate locally (Windows only)

1
2
# This import the certificate in the Current User's certificate store.
Import-PfxCertificate .\sfcert.pfx -CertStoreLocation Cert:\CurrentUser\My\

It should show you something along those lines:

1
> Import-PfxCertificate .\sfcert.pfx -CertStoreLocation Cert:\CurrentUser\My\

   PSParentPath: Microsoft.PowerShell.Security\Certificate::CurrentUser\My

Thumbprint                                Subject
----------                                -------
FFFFFFFFFFFFFFFFFFFFFFFFFFFFFFFFFFFFFFFF  CN=CLIGetDefaultPolicy

Final step (6) - Retrieving the necessary options before provisioning

Provisiong a secure cluster requires 3 values in the following order.

  1. Resource Id of our KeyVault
1
$resourceId=az keyvault show -n my-sfcluster-keyvault --query id -o tsv
  1. Certificate URL
1
$certificateUrl=az keyvault certificate show --vault-name my-sfcluster-keyvault -n sfcert --query sid -o tsv
  1. Certificate thumbprint

We got it in our previosu step but just in case you missed it? Here’s how to find it.

1
2
3
4
5
# Read locally
Get-ChildItem Cert:\CurrentUser\My\

# Read from Azure. Both should match
$thumbprint=az keyvault certificate show --vault-name my-sfcluster-keyvault -n sfcert --query x509ThumbprintHex -o tsv

Take those 3 values and get ready to set your Service Fabric Cluster on the Azure Portal.

1
@{Thumbprint=$thumbprint; ResourceId=$resourceId; CertificateUrl=$certificateUrl}

Complete Script

Source

Follow-up?

Are you interested in automating the creation of an Azure Service Fabric Cluster? What about Continuous Integration of an Azure Service Fabric Cluster?

Let me know in the comments!

Decoupling with Azure Functions bindings and Storage Queues triggers

If you want to decouple your application from your logic, it’s always useful to separate events happening and actual actions.

This technique is also known as Command Query Responsibility Segregation or CQRS for short. The main principle is to allow events to be queued in a messaging service and have a separate mechanism to unload them.

Traditionally, we would do something like this with Rabbit MQ and maybe a command line application that would run on your machine. With modern cloud based applications, we would create an App Service under Azure and have a WebJob handle all those messages.

The main problem with this approach is that your WebJobs scales with your application. If you want to process messages faster, you have to scale up. How unwieldy!

Here comes Serverless with Azure Functions

The thing with Azure Functions is that you can define a QueueTrigger and Table Output Binding, implement your business logic and be on your way.

That’s it! Here’s an example.

1
2
3
4
5
6
7
8
9
10
11
12
13
14
15
16
17
18
19
20
21
22
23
public static class MoveQueueMessagesToTableStorage
{
[FunctionName("MoveQueueMessagesToTableStorage")]
public static void Run([QueueTrigger("incoming-animals")]string myQueueItem,
[Table("Animals")]ICollector<Animal> tableBindings, TraceWriter log)
{

log.Info($"C# Queue trigger function processed: {myQueueItem}");

// todo: implement my business logic to add or not the defined rows to my Table Storage

tableBindings.Add(JsonConvert.DeserializeObject<Animal>(myQueueItem));
}
}

public class Animal : TableEntity
{
public Animal()
{

PartitionKey = "Default";
}
public string Race { get; set; }
public string Name { get; set; }
}

What about poison messages?

First, what’s a poison message? A poison message is a message that fails to be processed correctly by your logic. Either the message was malformed, or your code threw an exception. Whatever the reason, we need to take care of that!

Let’s add another function to handle those extraordinary cases.

1
2
3
4
5
6
7
[FunctionName("MoveQueueMessagesToTableStorage-Poison")]
public static void HandlePoison([QueueTrigger("incoming-animals-poison")]string myQueueItem, TraceWriter log)
{

log.Error($"C# Poison Queue trigger function on item: {myQueueItem}");

// handle cases where the message just can't make it.
}

Waaaaaait a minute… what’s this incoming-animals-poison you tell me? That, my friend, is automatically created when queue trigger fails five times in a row.

Did we just handle poison messages by just creating a single function? Yes.

Cost

So by now, you’re probably asking me:

Well, how much is this serverless goodness going to cost me?

That’s the beauty of it. On a consumption plan? Zero. You only pay for what you use and if you use nothing or below the free quota? 0$

Takeaways

Creating a decoupled architecture is easier with a serverless architecture. Cost is also way easier to manage when you don’t need to pre-provision resources and are only paying for what you are executing.

git remote code execution bug of August 2017

This is a TLDR of the git bug.

There was a bug in git that affected the clone command.

What’s the bug?

A malformed git clone ssh://.. command would allow user to insert an executable within the URL and it would execute it.

Am I affected?

Easiest way to check is to run this simple command:

1
git clone ssh://-oProxyCommand=notepad.exe/ temp

Notepad opens? You’re vulnerable.

What you want is this:

1
C:\git_ws> git clone ssh://-oProxyCommand=notepad.exe/ temp
Cloning into 'temp'...
fatal: strange hostname '-oProxyCommand=notepad.exe' blocked

Visual Studio 2017

If you are running Visual Studio 2017, make sure you have version 15.3.26730.8 or higher.

I’m vulnerable. Now what.

  • Update Visual Studio through Tools > Extensions and updates....
  • Update git

Stay safe my friends.

Demystifying serverless

I’ve been working on building and deploying applications for over 15 years. I remember clearly trying to deploy my first application on a Windows Server 2000. The process was long. Tedious. First, you had to have the machine. Bigger companies could afford a data center and a team to configure it. Smaller companies? It was that dusty server you often find beside the receptionist when you walk-in the office. Then, you had to figure out permissions, rolling logs, and all those other things you need to do to deploy a web server successfully.

And your code isn’t even deployed yet. You only have the machine.

Imagine having to deal with that today. It would be totally unacceptable. Yet, we still do it.

Present

If you’re lucky, your company have moved that server to a colocated data center or even as VMs to the cloud.

If you already made the move to Platform as a Service, everything is ok. Right?

Definitely not! We’re still stuck creating machines. Even though it doesn’t look like it, we’re still managing dusty servers. We’re still doing capacity planning, auto-scaling, selecting plans to keep our costs under control. So many things that you need to plan before you put down a single line of code.

There must be a better way.

Imagine an environment where you just deploy your code and the cloud figure out what you need.

Serverless

Let me talk about serverless. One of those buzzword bingo terms that comes around often. Let’s pick it apart and make sure we truly understand what it means.

Serverless isn’t about not having servers. Serverless is not even about servers.

It’s about letting you focus on your code. On your business.

What makes you different from your competitors?

What will make you successful?

Provisioning server farms? Capacity planning? This doesn’t make you different. It just makes you slow.

Serverless is about empowering you to build what differentiates you from the other business down the road.

Don’t focus on infrastructure.

Focus on what makes you amazing.

What is Azure Functions?

Azure Functions is Microsoft’s implementation of serverless. It allows you to run code in a multitude of languages, from any environment and deploy it in seconds.

Creating an Azure Function from the CLI, the Azure Portal or even Visual Studio is just as simple as it should be.

Azure Functions will only charge you for what you use. If your API isn’t used, it’s free. As your business grows and your application starts getting customers, it’s when you start paying. You’re not spending money until you start making money.

The best part? You get enough free executions per months to start your next startup, a micro-SaaS or the glue to integrate existing systems.

Stop postponing it. Try Azure Functions. Right now.

We’re here.

We want you to succeed.

Let us help you be amazing.

I'm joining Microsoft

I’ve been operating as a single man consultancy business for almost four years. I’ve never been as happy to not have any other clients lined up.

This week is going to be my last week working alone.

It will also be last week I’ll be a Microsoft MVP.

I’ve been a Microsoft MVP for the last 6 years and I’ve been awarded my 7th award this month. Although it pains to leave this wonderful group of technological experts, I’m leaving all of this behind for one of the most exciting moments of my career.

I’ll be joining Microsoft as a Cloud Developer Advocate.

Why Microsoft?

So, time to cue the joke about the chip implant, joining the collective and what not. I used to do them too and I’ll probably keep on making them.

Microsoft today is focused on making things better for everyone. Every time I hear Satya talk, I hear that change. Every time I meet with product teams? I see that change.

Microsoft’s vision is aligned with what I believe. It’s a simple as that.

Why now?

One question I was asked before I joined Microsoft was… why now? Why would you drop everything you’ve done so far to go work for Microsoft? It’s a question everyone should ask themselves before doing any big moves.

I’ve always been keen on sharing what I know, what I learned. It is after all how I became an MVP. But I’ve always been limited in the amount of time that I could share my passion. There’s only so many hours in a day and some must be on mandate where I’m necessarily in a position to share my love and knowledge. With Microsoft, I’ll be able to focus all my time to share my love and passion for Azure, .NET, and whatever new technology I fall in love with.

What’s the job?

My title? Cloud Developer Advocate. Description? Share my love of the platform with the rest of the world.

Whether it’s through blog posts, libraries, conferences and whatever is needed to make a developer’s life easier. I’ll be there.

I’ve been working with Azure for the last 3 years. Every chance I got, I ensured that my client would understand and enjoy what they were getting into.

I want to do that with the whole planet now.

Dream big or go home, right?

Automatically generating my resume with JSON Resume in two languages

TLDR: skip directly to the code

I’ve often touted the advantages of statically generated websites. Security, ease of scaling, etc.

One the point I normally touch is that when you start dynamically generating websites, you often think of the data a different way. You see sources and projections. Everything is just waiting to be transformed into a better shared format.

Now comes the resume. If you guys haven’t noticed yet, I’m a native French speaker from the Land of Poutine. You might think that we do everything in French but that is just wrong. Some clients will require English communication while others will require French. What that means is that when I submit a resume for a permanent job or a contractual work, I need to maintain two set of resume. One in each language.

While most people will only maintain a single Word document that will follow their graduation to their death, I have two. So every time I add something new to it, I have to reformat everything. It’s a pain. More than maintaining just one. I was tired of always maintaining the same set of data so set myself to skip the formatting part of resume generation to a minimum.

Introducting JSON Resume

That’s where I found a JSON standard for resume called JSON Resume

An example of the schema can be found here.

Here’s what a very trimmed down version looks like:

1
2
3
4
5
6
7
8
9
10
11
12
13
14
15
16
17
18
19
20
21
22
23
24
25
26
27
28
29
30
31
32
33
34
35
36
37
38
39
40
41
42
43
44
45
{
"basics": {
"name": "John Doe",
"label": "Programmer",
"picture": "",
"email": "[email protected]",
"phone": "(912) 555-4321",
"website": "http://johndoe.com",
"summary": "A summary of John Doe...",
"location": {
"address": "2712 Broadway St",
"postalCode": "CA 94115",
"city": "San Francisco",
"countryCode": "US",
"region": "California"
}

}
,

"work": [{
"company": "Company",
"position": "President",
"website": "http://company.com",
"startDate": "2013-01-01",
"endDate": "2014-01-01",
"summary": "Description...",
"highlights": [
"Started the company"
]
}]
,

"education": [{
"institution": "University",
"area": "Software Development",
"studyType": "Bachelor",
"startDate": "2011-01-01",
"endDate": "2013-01-01",
"gpa": "4.0",
"courses": [
"DB1101 - Basic SQL"
]
}]
,

"skills": [{
"name": "Web Development",
"level": "Master",
"keywords": ["HTML","CSS","Javascript"]
}]

}

Ain’t that awesome? You have something that is basically a representation of your experience, education and your personal information about you. You can even group your skills into nice little categories and set a proficiency level.

Now we need to generate something out of this otherwise, it’s useless.

Generating HTML from JSON Resume

TLDR: skip directly to the code

I’ll be frank, I tried the [CLI tool][JSONCLI] that came with the website. The problem is… it doesn’t quite work. It works if everything is the default option. Otherwise? The tool looked broken. So I’ve done something different. I picked a theme, and copied its stylesheet and it’s template into my own repository to create my own resume.

I don’t even need to ensure backward compatibility. In fact, you could, easily, reverse engineer any of these theme and have something working within minutes.

My Theme: StackOverflow

While the index.js might be interesting to see how they assemble together, it’s just a simple HandleBars file with some CSS. Nothing easier. Copying those three files will allow you to generate HTML out of it.

The package you might need in your own NodeJS app will be described here. We’re talking HandleBars and momentjs.

Re-importing everything.

The first thing I did, was create my own index.js to get cracking.

1
2
3
(function () {
// this is a self executing function.
}());

With this, let’s get cracking. First, we need some dependencies.

1
2
3
4
5
6
7
var fs = require("fs");
var path = require("path");
var Handlebars = require("handlebars");

// these are refactored HandleBars helpers that I extracted into a different file
var handlebarsHelpers = require("./template/HandlebarHelpers");
handlebarsHelpers.register();

Then you need to get your JSON Resume file that you painstakingly wrote.

1
2
3
var base = require("./MaximeRouiller.base.json");
var english = require("./MaximeRouiller.en.json");
var french = require("./MaximeRouiller.fr.json");

I chose to go with a base that set the common values among both resume.

Next, let’s make sure to create an output directory where we’ll generate those nice resume.

1
2
3
4
var compiled = __dirname + '/compiled';
if (!fs.existsSync(compiled)) {
fs.mkdirSync(compiled, 0744);
}

Finally, we need a render function that we’ll call with 2 different objects. One for French, the other one for English.

1
2
3
4
5
6
function render(resume, filename) {
// TODO next
}

render(Object.assign(base, english), 'MaximeRouiller.en');
render(Object.assign(base, french), 'MaximeRouiller.fr');

Object.assign is the fun part. This is where we merge the two JSON files together. This is a dumb merge so existing properties will get overwritten. That includes array.

So now that we have this, the render function actually need to generate the said HTML.

1
2
3
4
5
6
7
8
9
10
11
12
13
function render(resume, filename) {
// reading the file synchronously
var css = fs.readFileSync(__dirname + "/template/style.css", "utf-8");
var tpl = fs.readFileSync(__dirname + "/template/resume.hbs", "utf-8");

//Write to specified filenamem, the generated HTML from Handlebars.compile
fs.writeFile(compiled + "/" + filename + ".html", Handlebars.compile(tpl)({
css: css,
resume: resume
}), {
flag: 'w'
});
}

That’s it for HTML. Handlebars.compile(tpl) will create an executable function that needs parameters to execute. First, the CSS itself and finally, the resume object that contains the model from which we generate everything.

The write flag is just to ensure that we overwrite existing files.

Running node index.js will now generate two files in /compiled/. MaximeRouiller.en.html and MaximeRouiller.fr.html.

HTML is great but… most recruiting firms will mostly only work with PDF.

Modifying our script to generate PDF in the same folder

First, we need to install a dependency on phantomjs-prebuilt with node install phantomjs-prebuilt --save.

Then we require it: var phantomjs = require('phantomjs-prebuilt');

Then you download the rasterize.js file and you copy this code right after we generate our HTML.

1
2
3
var program = phantomjs.exec('./scripts/rasterize.js', './compiled/' + filename + '.html', './compiled/' + filename + '.pdf', 'Letter')
program.stdout.pipe(process.stdout);
program.stderr.pipe(process.stderr);

Same comment except we’re piping the HTML we just generated into PhantomJS to generate HTML with the Letter US format of 8 and a half inches by 11 inches.

That’s it.

The possibilities

In my scenario, I didn’t require any other format. I could have generated more with something like pandoc and it would be a good way to generate a thousand different version of the same resume in different format.

When creating new ways to make the same old, I like to think of the different possibilities this could get used in.

  • Storing a database of resume and generating them on the fly in a company’s format in a minute.
  • Changing your resume in 25 different themes easily
  • Instead of using Handlebar to generate in node, we could have generate the same resume with a barebone ASP.NET Core with Razor using my Poorman static site generator. This could allow you to localize your template easily too or using a familiar content rendering.

In any case, my scenario was easy and there’s no way I’m pushing farther than is required.

Do you see other possibilities I missed?

Creating and using NuGet packages with Visual Studio Team Services Package Management

The application I’m building for my client at the moment had some interesting opportunities for refactoring.

More precisely, to extract some reusable components that could be used on other projects. When you call on reusability, it begs for NuGet.

Setting the stage

All of those projects are hosted on Microsoft Visual Studio Team Services and this service has just the right extension for us. It may not be the best of all tools but for this very Microsoft focused client, it was the most cost efficient option for us.

Pricing

I won’t delve in the details but here’s the cost for us. At the time of this writing, Package Management offers 5 free users and additional feed users are at $4/months/users excluding any users on an MSDN Enterprise license.

Installing the extension

The first step is to install the extension. As with all extension, you will need to be an Administrator of your VSTS account to do that. If you are not, you can still go to the marketplace and request the plugin. It won’t actually install, but it will be visible in the extension menu of your account.

https://ACCOUNTNAME.visualstudio.com/_admin/_extensions

Make sure Package Management is installed before going further

Once your VSTS administrator approve the extension and the related fees, we’re ready to setup our feed.

Setting up my first feed

Next we’re going to pick any project and go into the Build & Release section.

Here’s a gotcha. Look at this menu.

Build & Release Menu

Everything is specific to your project. Right? Well it sure is not for Packages.

Feeds are NOT project specific. They may have permissions that makes them look project specific but they are not. They are scoped on your account. With that being said, I’m not interested in creating 1 feed per project.

I created a feed and called it Production (could also be Main, Release or the name of your favorite taco).

Click the button Connect to feed and copy the Package source URL to a Notepad. We’re going to be reusing it.

Setting up my NuGet nuspec file.

Here’s my default PROJECT.nuspec file.

1
2
3
4
5
6
7
8
9
10
11
12
13
14
15
<?xml version="1.0"?>
<package >
<metadata>
<id>$id$</id>
<version>$version$</version>
<title>$title$</title>
<authors>$author$</authors>
<owners>$author$</owners>
<projectUrl>https://ACCOUNTNAME.visualstudio.com/PROJECT/</projectUrl>
<requireLicenseAcceptance>false</requireLicenseAcceptance>
<description>$description$</description>
<copyright>Copyright 2017</copyright>
<tags></tags>
</metadata>
</package>

Yep. That easy. Now, add this file to your project that will be created into a NuGet.

For us, it’s a simple Class Library without too much dependencies so it’s not terribly complicated.

Validating your AssemblyInfo.cs

1
2
3
4
5
[assembly: AssemblyTitle("MyAwesomePackage")]
[assembly: AssemblyDescription("Please provide a description. Empty is no good.")]
[assembly: AssemblyCompany("This will be the Owner and Author")]
[assembly: AssemblyProduct("MyAwesomePackage")]
[assembly: AssemblyCopyright("Copyright © MyCompanyName 2050")]

This is the bare minimum to have everything working. Empty will not do and, well… we’re there.

Fill them up.

AssemblyInfo.cs Versioning

1
[assembly: AssemblyVersion("1.0.*")]

For public OSS package, this might be a horrendous way to do versioning. Within a company? This is totally fine for us. However, we will need to change this manually when we introduce breaking changes or major features.

By default, the $version$ token will take on AssemblyInformationalVersionAttribute, then AssemblyVersionAttribute and finally use 0.0.0.0. AssemblyFileVersion will never be used.

Read up more on the $version$ token here.

Once you are here, most of the work is done. Now is time to create the package as part of your build.

Build vs Release

Here’s what is important to get. It is totally possible to publish your package as part of your build. But we won’t be doing so. Building should create artifacts that are ready to publish. They should not be affecting environments. We may create 100s of builds in a release cycle but only want to deploy once in production.

We respect the same rules when we create our NuGet packages. We create the package in our Build. We publish to the feed in our release.

Building the NuGet package

The first thing to do is to add the NuGet Packager task and drag it to be just below your Build Solution task.

NuGet Packager task

By default, it’s going to create a package out of all csproj in your project. Do not change it for nuspec. This is not going to work. Not with our tokenized nuspec file. So just target the task to the right project. To make sure that the package is easily findable in the artifacts, I’ve added $(build.artifactstagingdirectory) to Package Folder.

NuGet Packager task

[2017-04-07] WARNING: If your package requires a version of NuGet that is higher than 2.X, you will have to specify the path to NuGet manually. The agents are not running the latest version of NuGet at the time of this writing. It does not allow to pick a specific version in the UI either. You have to provide your own.

Once your build succeed, you should able to go to your completed and see your package in the artifact explorer.

Created Package

Publishing the NuGet Package

So the package is built, now let’s push it to the feed we created.

If you are just publishing a package like me, your release pipeline should be very simple like mine.

Release Pipeline

Remember that feed URL we stored in a Notepad earlier? Now’s the time to bring it back.

The NuGet Publisher task is going to need it. Just make sure you select Internal NuGet Feed and copy/paste it in your Internal Feed URL field.

Release Pipeline

Now would be a good time to create a new release for your previous build.

NOTE: Make sure that you configure your Triggers properly. In my case, my build is backed by a Production branch so I’ve set the trigger to be Continuous Deployment. If you are not branching, you may want to launch a release manually instead.

Once your release is done, your package (seen in the Artifact Explorer) should now appear in your feed.

Created package

Using the feed

If you look at the Connect to feed, you may be tempted to try the VSTS Credential Provider. Don’t. You don’t need it. You need a file. You need a nuget.config file.

VSTS Credential Provider is only used when you want to do command line operations on the feed.

1
2
3
4
5
6
<?xml version="1.0" encoding="utf-8"?>
<configuration>
<packageSources>
<add key="Production" value="https://ACCOUNT.pkgs.visualstudio.com/_packaging/Production/nuget/v3/index.json" />
</packageSources>
</configuration>

Create a nuget.config file with your feed URL (you still had it in your Notepad, right?) and just drop it beside your SLN file. If your solution was already loaded in Visual Studio, close it and re-open it.

If you right click on your solution and select Manage NuGet Packages for Solution... and expend the Package Source you will see your feed present.

All of your packages should be visible and installable from there.

Manage Packages for Solution

Are you using it?

This is my first experience creating a NuGet package in an enterprise environment. I’ve probably missed on a ton of opportunities to make the process better.

Did I miss anything? Do you have a better strategy for versioning? Let me know in the comments!

Since our authentication is already on Azure Active Directory, authentication is seamless.

What's new in .NET Core 1.0? - New Project System

There’s been a lot of fury from the general ecosystem about retiring project.json.

It had to be done if Microsoft didn’t want to work in parallel on 2 different build systems with different ideas and different maintainers.

Without restarting the war that was the previous GitHub issue, let’s see what the new project system is all about!

csproj instead of project.json

First, we’re back with csproj. So let’s simply create a single .NET Core Console app from Visual Studio that we’ll originally call ConsoleApp1. Yeah, I’m that creative.

Editing csproj

By right clicking on the project, we can see a new option.

Editing csproj

Remember when opening csproj before? You could either have the solution loaded or edit the csproj manually. Never at the same time. Of course, we would all open the file in Notepad (or Notepad++) and edit the file anyway.

Once we came back to Visual Studio however, we were prompted to reload the project. This was a pain.

No more.

Editing csproj

Did you notice something?

New csproj format

1
2
3
4
5
6
7
8
<Project Sdk="Microsoft.NET.Sdk">

<PropertyGroup>
<OutputType>Exe</OutputType>
<TargetFramework>netcoreapp1.1</TargetFramework>
</PropertyGroup>

</Project>

Yeah. It is. The whole content of my csproj. Listing all your files is not mandatory anymore. Here’s another thing, open Notepad and copy/paste the following into it.

1
2
3
4
public class EverythingIsAwesome
{
public bool PartOfATeam => true;
}

Now, save that file (mine is Test.cs) at the root of your project. Right beside Program.cs and swap back to Visual Studio.

Everything is awesome

That’s the kind of features my dreams are made of. No more having to Show all files, then include external files into my projects, then resolving all those merge conflicts.

Excluding files

What about the file you don’t want?

While keeping the csproj open, right click on Test.cs and exclude it. Your project file should have this added to it.

1
2
3
<ItemGroup>
<Compile Remove="Test.cs" />
</ItemGroup>

What if I want to remove more than one file? Good news everyone! It supports wildcards. You can remove, single file, folders and more.

Now remove that section from your csproj. Save. Test.cs should be back in your solution explorer.

Are you going to use it?

When new features are introduced, I like to ask people whether it’s a feature they would use or if it will impact their day to day.

So please leave me a comment and let me know if you want me to dig deeper.

Contributing to Open-Source - My first roslyn pull request - Fixing the bug

Getting your environment ready

If you haven’t done so yet, please check part 1 to get your environment ready. Otherwise, you’ll just run in circle.

Reading the bug

After getting the environment ready, I decided to actually read what the bug was all about. I did a quick glance at first but I’ll be honest… I was hooked by the “low hanging fruit” description and the “up for grabs” tag. I didn’t even understand was I was throwing myself into…

Update: Some issues marked as “up for-grab” does not mean they are easy. If you grab an issue, leave a comment and do not hesitate to ask for help. They are there to help and guide you.

Here’s the bug: dotnet/roslyn/issues/18391.

So let’s read what it is.

The Bug

So basically, there’s a refactoring when you are hiding a base member to put the new keyword on the derived property.

That refactoring was broken for fields.

It refactored to:

1
2
3
public class DerivedClass : BaseClass {
public const new int PRIORITY = BaseClass.PRIORITY + 100;
}

Instead of:

1
2
3
public class DerivedClass : BaseClass {
public new const int PRIORITY = BaseClass.PRIORITY + 100;
}

Do you see it? The order of the parameters are wrong. The new keyword MUST be before the const declaration. So the refactoring causes a compilation error. Hummm… that’s bad.

Help. Please?

That’s where Sam really helped me. It’s how it should be in any open source project. Sam pointed me in the right direction while I was trying to understand the code and find a fix.

The problematic code

HideBaseCodeFixProvider.AddNewKeywordAction.cs

1
2
3
4
5
6
7
8
9
10
11
12
13
14
15
16
17
18
19
20
21
22
23
24
25
26
27
private SyntaxNode GetNewNode(Document document, SyntaxNode node, CancellationToken cancellationToken)
{

SyntaxNode newNode = null;

var propertyStatement = node as PropertyDeclarationSyntax;
if (propertyStatement != null)
{
newNode = propertyStatement.AddModifiers(SyntaxFactory.Token(SyntaxKind.NewKeyword)) as SyntaxNode;
}

var methodStatement = node as MethodDeclarationSyntax;
if (methodStatement != null)
{
newNode = methodStatement.AddModifiers(SyntaxFactory.Token(SyntaxKind.NewKeyword));
}

var fieldDeclaration = node as FieldDeclarationSyntax;
if (fieldDeclaration != null)
{
newNode = fieldDeclaration.AddModifiers(SyntaxFactory.Token(SyntaxKind.NewKeyword));
}

//Make sure we preserve any trivia from the original node
newNode = newNode.WithTriviaFrom(node);

return newNode.WithAdditionalAnnotations(Formatter.Annotation);
}

We are not interested in the first 2 parts (propertyStatement, methodStatement) but in the 3rd one. My first impression was that const was considered a Modifier and that new was also a modifier. The normal behavior or List.Add(...) is to append at the end (const new).

That’s where the bug is.

The Solution

Well… I’m not going to walk you through the whole process but basically, I tried to do the job myself by trying to insert the new keyword at Position 0 in an array. After a few back and forth with Cyrus Najmabadi, we finished on a syntax that should use their new SyntaxGenerator.

The SyntaxGenerator will ensure that all modifiers are in the proper order. Also, it works for all properties. Here is the refactored code once all the back and forth were done.

1
2
3
4
5
private SyntaxNode GetNewNode(Document document, SyntaxNode node, CancellationToken cancellationToken)
{

var generator = SyntaxGenerator.GetGenerator(_document);
return generator.WithModifiers(node, generator.GetModifiers(node).WithIsNew(true));
}

Wow. Ain’t that pretty.

Unit Testing

HideBaseTests.cs

A big part of Roslyn are the tests. You can’t write a compiler and have zero tests. There’s enough test in there to melt a computer.

The biggest amount of back and forth we did were on the tests. In fact, I added more lines of tests in this than actual production code.

Here’s a sample test I did:

1
2
3
4
5
6
7
8
9
10
11
12
[WorkItem(14455, "https://github.com/dotnet/roslyn/issues/14455")]
[Fact, Trait(Traits.Feature, Traits.Features.CodeActionsAddNew)]
public async Task TestAddNewToConstantInternalFields()
{
await TestInRegularAndScriptAsync(
@"class A { internal const int i = 0; }
class B : A { [|internal const int i = 1;|] }
",
@"class A { internal const int i = 0; }
class B : A { internal new const int i = 1; }
");
}

First, they are using xUnit so you have to brand everything with FactAttribute and TraitAttribute to properly category the tests.

Second, if you add a test that fixes a GitHub issue, you have to add the WorkItemAttribute the way I did it in this code. If you do this, Your test work.

Finally, the [| ... |] syntax. I don’t know anything about it but my assumption at the time was that it was what we were going to refactor and how we were expecting it to be handled.

Testing in Visual Studio

Remember when we installed the Visual Studio Extensibility Workload?

That’s where we use it. In the Roslyn.sln opened solution, find the project VisualStudioSetup and make it your start-up project. Hit F5.

A new instance of Visual Studio will be launched and you will be able to test your newly updated code. Launch a separate instance of Visual Studio.

You now have 1 experimental Visual Studio with your fixes and 1 standard instance of Visual Studio without your fixes.

You can now write the problematic code in the standard instance and see the problem. Copy/paste your original code in the experimental instance and marvel at the beauty of the bug fix you just created.

Creating the pull request

As soon as my code was committed and pushed to my fork, I only had to create a pull request from the GitHub interface. Once that pull request is created, any commits that you create on top of your fork will be included in this pull request.

This is where the back and forth with the .NET Team started truly.

What I learned

Building the compiler isn’t easy. Roslyn is a massive 200 projects solution that takes a lot of time to open. Yes. Even on the Surface Book pimped to the max with an SSD, an i7 and 16GB of RAM. I would love to see a better compartmentalization of projects so I don’t open those 200 projects all at once just to build a UI fix.

Sam and I had to do a roundtrip on the WorkItemAttribute. It wasn’t clear how it should be handled. So he created a pull request to address that.

Talking about tests, the piped string notation was really foreign to me and took me a while to understand. Better documentation should be among the priorities.

My experience

I really loved fixing that bug. It was hard, then easy, then lots of back and forth.

In the end, I was pointed in the right direction and I really want to tackle another one.

So my thanks to Sam Harwell and Cyrus Najmabadi for carrying me through fixing a refactoring bug in Visual Studio/Roslyn. If you want contributors, you need people like them to manage your open source project.

Will you contribute?

If you are interested, there is a ton of issues that are up-for-grabs on the roslyn repository. Get ready. Take one and help make the Roslyn Compiler even better for everybody.

If you are going to contribute, please let me know in the comment! If you need more details, please also let me know in the comments.

Contributing to Open-Source - My first roslyn pull request - Getting the environment ready

I’ve always wanted to contribute back to the platform that constitute the biggest part of my job.

However, the platform itself is huge. Where do you start? Everyone says do documentation. Yeah. I’ve done that in the past. Those are easy pick. Everyone can do them. I’ve wanted to contribute real actual code that would help developers.

Why now?

I had some time around lunch and I saw this tweet by Sam Harwell:

Low-hanging fruit. Compiler. Actual code.

What could possibly go wrong?

The Plan

The plan was relatively simple. I can’t contribute if I can’t get the code compiling on my machine and the test running.

So the plan went as such:

  1. Create a fork of roslyn.
  2. git clone the repository to my local machine
  3. Follow the instructions of the repository. Well… the master branch instructions
  4. Test in Visual Studio
  5. Create a pull request

Getting my environment ready

I have a Surface Book i7 with 16Gb of RAM. I also have Visual Studio 2017 Enterprise installed with the basic .NET and WebDev workload installed.

Installing the necessary workloads

The machine is strong enough but if I wanted to test my code in Visual Studio, I would need to install the Visual Studio extension development workload.

This can easily be installed by opening the new Visual Studio Installer.

Forking the repository

So after installing the necessary workloads, I headed to GitHub and went to the roslyn repository and created a fork.

Forking Roslyn

Cloning the fork

You never want to clone the main repository. Especially in big projects. You fork it, and submit pull request from the fork.

So from my local machine I ran git clone from my fork:

Cloning Roslyn

What it looks like for me:

1
git clone https:github.com/MaximRouiller/roslyn.git

This may take a while. Roslyn is massive and there is ton of code. Almost 25k commits by the time of this post.

Running the Restore/Build/Test flow

That’s super simple. You go to the roslyn directory with a prompt and you run the following command sequentially.

  • Restore.cmd
  • Build.cmd
  • Test.cmd

If your machine doesn’t use 100% CPU for a few minutes, you may have a monster of a machine. This took some a time. Restore and build were not too slow but the tests? Oh god… it doesn’t matter what CPU you have. It’s going down.

As I didn’t want to spend another 30 minutes re-running all the tests, Sam Harwell suggested to use the xunit.runner.wpf to run specific tests as to avoid re-running the world. Trust me. Clone and build that repository. It will save you time.

And that completes the Getting the environment ready.

Time to actually fix the bug now.

Fixing the bug

Stay with us for part 2 where we actually get to business.

What's new in VS2017? - Visual Studio Installer

When installing Visual Studio in the past, you would be faced with a wall of Checkboxes that would leave wondering what you needed for what.

Introducing Workloads

Visual Studio 2017 workloads

Workloads are an easy way to select what kind of work you are going to do with Visual Studio. .NET Desktop development? Windows Phone? Web? All are covered.

If you look at that screenshot, you can see something new in there that wasn’t included previously. Azure. No more looking around for that Web Platform Installer to install the proper SDK for you.

You can access it directly from the installer. But what happens once you’re done and you want to modify your workloads?

If you start working on Visual Studio extensions, you need to be able to install that too.

Access the Installer after installation

There is two ways.

The first is to just press your Windows key and type Visual Studio Installer. Once the window is opened, you click the little hamburger menu and click modify.

The second is to access it through the File > New Project... menu.

Visual Studio 2017 workloads through projects

By clicking this link, the installer will open for you without having to go through the hamburger menu. Just pick your features.

Does that matter for you?

How do you like the new installer? Is it more user friendly than what was before?

What else could be improved? Let me know in the comments.

What's new in VS2017? - Lightweight Solution Load

There’s a brand new option in Visual Studio 2017 that many users might overlook. It’s called Lightweight Solution Load.

While opening solutions in most project is relatively simple, some just simply aren’t.

If you take a solution like roslyn; this project has around 200 projects. That is massive. To be fair, you don’t need to be that demanding to see performance degradation in Visual Studio. Even if Visual Studio 2017 is faster than 2015, huge solutions can still take a considerable amount of time to load.

This is where Lightweight Solution Load comes into play.

What is lightweight solution load?

Once this option is turned on, Visual Studio will stop pre-loading all projects completely but instead rely on the minimal amount of information needed to have it functional in Visual Studio. Files will not be populated until the project is expanded and other dependencies that are not required yet will also not be loaded.

This allows for you to open a solution, expand a project, edit a file, recompile, and be on your way.

How to turn it on?

There’s two ways you can turn it on. Individually for a single solution by right clicking on a solution and selecting this option:

Turning it on for an Individual Solution

Or globally for all future solutions that are going to be loaded by opening your Tools > Options... menu:

Turning it on for All Solutions

What is the impact?

Beside awesome performance? There might be Visual Studio features that will just not work unless a project is fully loaded. Please see the list of known issues for the current release.

Alternative

If you do not want to play with this feature but you still find your solution to be too long to load, there’s an alternative.

Break up your solutions in different chunks. Most applications can be split into many smaller size solutions. This reduces load time as well as faster compile time in general.

Are you going to use it?

When new features are introduced, I like to ask people whether it’s a feature they would use.

So please leave me a comment and let me know if this feature is going to be used on your projects. How many projects do you normally have in a solution?

What's new in VS2017 and C# 7.0? - Throw Expression

throw has been a keyword since the first version of C#. The way the developer interact with it hasn’t been touched ever since.

Sure, lots of new features has been brought on board since but… throw? Never touched until now.

C# 6.0

I do not really need to tell you how to throw an exception. There’s 2 ways.

1
2
3
4
5
6
7
8
9
10
11
12
13
public void Something()
{

try
{
// throwing an exception
throw new Exception();
}
catch(Exception)
{
// re-throw an exception to preserve the stack trace
throw;
}
}

And that was it. If you wanted to throw an exception any other way,

C# 7.0

All you see below are invalid before C# 7.0.

1
2
3
4
5
6
7
8
9
10
11
12
13
14
public class Dummy
{
private string _name;

public Dummy(string name) => _name = name ?? throw ArgumentNullException(nameof(name));
public void Something(string t)
{

Action act = () => throw new Exception();
var nonNullValue = t ?? throw new ArgumentNullException();
var anotherNonNullValue = t != null ? t : throw new ArgumentNullException();
}

public string GetName() => return _name;
}

The difference

Oh so many of them. Here’s what was included in the previous snippet of code.

You can now throw from:

  • Null-Coalescing operator. The ?? operator used to provide an alternative value. Now you can use it throw when value shouldn’t be null.
  • Lambda. Still don’t understand exactly why it wasn’t allow before but now? Totally legit.
  • Conditional Operator. Throw from the left or the right of the ?: operator anytime you feel like it. Before? Not allowed.
  • Expression Body. In fact, any expression body will support it.

Where you still can’t throw (that I verified):

  • if(condition) statement. Cannot be used in the condition of a if statement. Even if it’s using a null-coalescing operator, it won’t work and is not valid syntax.

Are you going to use it?

I know that not everyone will necessarily use all of these new form of expression body. But I’m interested in your opinion.

So please leave me a comment and let me know if it’s something that will simplify your life or, at least, your code.

What's new in VS2017 and C# 7.0? - More Expression Body

Expression Bodied functions is a relatively new concept brought to use in C# 6.0 to facilitate the creation of properties that included too much ceremony.

C# 7.0 remove even more ceremony from many more concepts.

C# 6.0

Previously, C# 6.0 introduced the concept of Expression bodies functions.

Here are a few examples.

1
2
3
4
// get only expression bodied property
public string MyProperty => "Some value";
// expression bodies method
public string MyMethod(string a, string b) => return a + b;

C# 7.0

With the new release of C# 7.0, the concept has been added to:

  • constructors
  • destructors
  • getters
  • setters

Here are a few examples.

1
2
3
4
5
6
7
8
9
10
11
12
13
14
15
class TestClass
{
private string _name;

// expression-bodied constructor
public TestClass(name) => _name = name;
// expression-bodied destructor
~TestClass() => _name = null;

public string Name
{
get => _name;
set => _name = value;
}
}

The difference

The main difference in your code will be the amount of line of codes that will be used for useless curly braces or plumbing code.

Yet again, this new version of C# offer you more ways to keep your code concise and easier to read.

Are you going to use it?

I know that not everyone will necessarily use all of these new form of expression body. But I’m interested in your opinion.

So please leave me a comment and let me know if it’s something that will simplify your life or, at least, your code.

What's new in VS2017 and C# 7.0? - Local Functions

Local Functions is all about declaring functions within functions. See them as normal functions with a more restrictive scope than private.

In C# 6.0, if you needed to declare a method within a method to be used within that method exclusively, you created a Func or Action.

C# 6.0 - Local Functions (before)

But here are some issues with Func<>/Action<>, first they are an object. Not a function. Every time you declare a Func, you allocate memory for the variable and that could put unnecessary pressure in your environment.

Second, Func cannot call themselves (also know as recursion) and finally, they have to be declared before you use them just like any variables.

1
2
3
4
5
6
7
8
9
10
public void Something(object t)
{

// allocate memory
Func<object> a = () => return new object();

Func<int, int> b = (i) => {
//do something important
return b(i); // <=== ILLEGAL. Can't invoke itself.
};
}

Here’s the problem with those however… if you do not want to allocate the memory or if you need to du recursion, you need to move the method to an external method and scope it properly (private).

Doing that however, your method becomes available to the whole class to use. That’s not good.

C# 7.0 - Local Functions

1
2
3
4
5
6
7
8
9
10
public bool Something(object t)
{

return MyFunction(t);


bool MyFunction(object t)
{

// return value based on `t`
}
}

This is how a local function is declared in C# 7.0. It works the same way as a lambda but without allocation and without exposing private functions that shouldn’t be exposed.

The difference

The main difference are:

  • No memory allocation. Pure function that is just ready to be invoked and won’t be reallocated every time the method is called.
  • Recurse as much as you want. Since it’s a normal method, you can use recursion just like any other methods.
  • Use it before declaring it. Just like any other methods in a class, you can use it before (as in: line of codes) it is actually declared. Variables need to be declared before they are used.

Quickly, see it as normal method with a more aggressive scoping than private.

Are you going to use it?

When new features are introduced in a language, I like to ask people whether it’s a feature they would use.

So please leave me a comment and let me know if it’s something that will simplify your life or, at least, your code.