BrowserStack and Microsoft Partnership - Testing Microsoft Edge has never been that easy!

Microsoft just announced a partnership with BrowserStack to provide free testing of Microsoft Edge.

You probably already know that BrowserStack is the place to go when you need to test multiple browsers without installing them all on your machine.

Today, you can expand your manual and automated test to always include Microsoft Edge.

Not only that, they include 3 channels: Latest 2 stable versions as well as the preview (available to Insiders).

This will enable you to ensure that your application works on most Edge browsers as well as future proofing yourself with the next release.

Try it now!

What's new in VS2017 and C# 7.0? - Tuples

C# 7.0 introduces tuples for the first time. Although present in many other languages and introduced first as a generic type (System.Tuple<...>) before, it wasn’t until C# 7.0 that it was actually included into the language specification.

The raison-d’être of the Tuple is to return 2 values at the same time from a method.

C# 6.0

Many solutions were provided to us before.

We could use:

  • Out-Parameters but they are usable in async methods so it’s one solution.
  • System.Tuple<...> but just like Nullable<...>, it’s very verbose.
  • Custom type. But now you are creating classes that will never be reused ever again.
  • Anonymous types. But you were required to use dynamic which add a huge performance overheard everytime it’s used.

C# 7.0 - Defining tuples

The simplest use is like this:

1
2
3
4
5
6
7
8
9
10
11
public (string, string) Something()
{
// returns a literal tuple of strings
return ("Hello", "World");
}

public void UsingIt()
{

var value = Something();
Console.WriteLine($"{value.Item1} {value.Item2}")
}

Why stop there? If you don’t want to return ItemX as their name, you can customize it two different way.

1
2
3
4
5
6
7
8
9
public (string hello, string world) NamedTupleVersion1()
{
//...
}

public (string, string) NamedTupleVersion2()
{
return (hello: "Hello", world: "World");
}

The difference

The difference is simpler code, less out usage and less dummy classes that are only used to transport simple values between methods.

Advanced scenarios

C# 7.0 - Deconstructing tuples (with and without type inference)

When you invoke 3rd party library, tuples will already be with either their name or in a very specific format.

You can deconstruct the tuple and convert it straight variables. How you ask? Easily.

1
2
3
4
5
6
7
8
var myTuple = (1, "Maxime");

// explicit type definition
(int Age, string Name) = myTuple
// with type inference
var (Age, Name) = myTuple;

Console.WriteLine($"Age: {Age}, Name: {Name}.");

If you take the previous example, normally, you would need to access the first property by using myTuple.Item1.

Hardly readable. However, we created the Age variable easily by deconstructing it. Wherever the tuple come from, you can easily deconstruct it in one line of code with or without type inference.

Are you going to use it?

When new features are introduced in a language, I like to ask people whether it’s a feature they would use.

So please leave me a comment and let me know if it’s something that will simplify your life or, at least, your code.

What's new in VS2017 and C# 7.0? - Pattern Matching

C# 7.0 introduces pattern matching. Well, compared to other features, this require a little bit of explanation.

There is many types of pattern matching and three are supported in C# 7: Type, Const, Var.

If you used the is keyword before, you know it test for a certain type. However, you still needed to cast the variable if you wanted to use it. That alone made the is statement completely irrelevant and people preferred to cast and check for null rather than check for types.

C# 6.0 - Type Pattern Matching (before)

1
2
3
4
5
6
7
8
9
10
11
12
13
14
15
16
17
18
19
public void Something(object t)
{

var str = t as string;
if(str != null)
{
//do something
}

var type = t.GetType();

if (type == typeof(string))
{
var s = t as string;
}
if (type == typeof(int))
{
var i = t as int;
}
}

C# 7.0 - Type Pattern Matching

1
2
3
4
5
6
7
8
9
10
11
12
13
14
15
16
17
18
public void Something(object t)
{

if(t is string str)
{
//do something
}

switch(t)
{
case string s:
break;
case int i:
break;
//...
case default:
break;
}
}

The difference with Type Pattern Matching

This saves you one line in a pattern that is common and repetitive way too often.

More pattern matching

C# 7.0 - Const Pattern Matching

Const pattern is basically checking for specific value. That includes null check. Other constant may also be used.

1
2
3
4
5
6
7
8
9
10
11
public void Something(object t)
{

if(t is null){ /*...*/ }
if(t is 42) { /*...*/}
switch(t)
{
case null:
// ...
break;
}
}
C# 7.0 - Var pattern Matching

This is a bit more weird and may look completely pointless since it will not match any types.

However, when you couple it with the when keyword… it where magic starts coming.

1
2
3
4
5
6
7
8
9
10
11
12
13
private int[] invalidValues = [1,4,7,9];
public bool IsValid(int value)
{

switch(value)
{
case var validValue when( !invalidValues.Contains(value)):
break;

case var invalidValue when( invalidValues.Contains(value)):
break;

case default:
break;
}
}

Of course, this example is trivial but add some real-life Line Of Business applications and you end up with a very versatile of putting incoming values into the proper bucket.

Are you going to use it?

When new features are introduced in a language, I like to ask people whether it’s a feature they would use.

So please leave me a comment and let me know if it’s something that will simplify your life or, at least, your code.

What's new in VS2017 and C# 7.0? - Out Variables

When using certain APIs, some parameters are declared as out parameters.

A good example of this is the Int32.TryParse(string, out int) method.

So let’s check the difference in invocation between C# 6.0 and C# 7.0

C# 6.0

1
2
3
4
5
6
7
8
public void DoSomething(string parameter)
{

int result;
if(Int32.TryParse(parameter, out result))
{
Console.WriteLine($"Parameter is an int and was parsed to {result}");
}
}

C# 7.0 (with type inference)

1
2
3
4
5
6
7
8
9
10
11
12
13
public void DoSomething(string parameter)
{

if(Int32.TryParse(parameter, out int result))
{
Console.WriteLine($"Parameter is an int and was parsed to {result}");
}

// w/ type inference
if(Int32.TryParse(parameter, out var i))
{
// ....
}
}

The difference

Now you don’t need to define the variable on a separate row. You can inline it directly and, in fact, you could just use var instead of int in the previous example since it can infer the type directly inline. This is called type inference.

It is important to note however that the variable is scoped on the method and not the if itself. So the result parameter is available in both the if and the else scope.

Are you going to use it?

When new features are introduced in a language, I like to ask people whether it’s a feature they would use.

So please leave me a comment and let me know if you are going to use inline out variables.

What's new in VS2017 and C# 7.0? - Literals

Literals

C# 6.0

The C# 6.0 way to define integers in .NET is to just type the number and there’s no magic about it.

You can assign it directly by typing the number or if you have a specific hexadecimal, you can use the literal annotation 0x to define it.

Not teaching anyone anything new today with the following piece of code.

1
2
int hexa = 0x12f4b12a;
int i = 1235;

C# 7.0

Now in C# 7.0, there’s support for binary annotations. If you have a specific binary representation that you want to test, you can use the literal annotation 0b to define it.

1
var binary = 0b0110011000111001;

Another nice feature that is fun to use is the separator. It was supposed to be introduced in C# 6.0 but was delayed to 7.0.

They do not affect the value in any way and can be applied to any literals.

1
2
3
var hexa = 0x12f4_b12a;
var binary = 0b0110_0110_0011_1001;
var integer = 1_000_000;

They can be applied any where and will not impact the evaluation of the number.

Are you going to use it?

When new features are introduced in a language, I like to ask people whether it’s a feature they would use.

So please leave me a comment and let me know if binary or separators are a feature that will be used.

Creating my first .NET Core app running on Linux with Docker

I’ve always liked the idea of running .NET Core on multiple platforms. I’ve never had the guts however to jump cold feet into a Linux installation only on my machine.

Since Windows 10 added support for Hyper-V and Docker a while ago and with the release of the tooling for .NET Core with VS2017, I decided to give it another go.

Here is what you will need to follow along before we get any further.

Requirements

  • Windows 10 64bits Pro and higher. This does not work with anything less.
  • If you haven’t installed Hyper-V, Docker will prompt you to install it for you and reboot your machine. Save your work!
  • Install Docker for Windows (I went with stable) and follow the steps

Making sure your C drive is shared

The last bit of requirement to ensure that your machine is ready to run .NET Core apps is to ensuring that your C drive is shared.

Once you install Docker for Windows for the first time, make sure to go in the notification tray and right click on the whale.

The whale

Once the contextual menu pops up, select the settings option:

The setting

Finally, go into the Shared Drives menu on the left and ensure that the C drive is shared. It will prompt your for your password.

Shared Drives

Click on Apply and now we are ready.

Creating a docker application

Once our little pre-requisite are satisfied, the steps are really easy to go from there.

We will create a new ASP.NET Core Web Application and making sure that we enable docker support.

New App

If you missed the previous step, it’s always possible to enable docker support once the application is created by right clicking on your project and clicking Add > Docker Support.

Adding docker support

Whatever path you took, you should now have 2 projects in your solution. Your initial project and a docker-compose project.

docker-compose

Testing out our application

The first modification that we will do to our application is add a line in our /Views/Home/Index.cshtml file.

1
<h1>@System.Runtime.InteropServices.RuntimeInformation.OSDescription</h1>

I’ve added it to the top to make sure it works.

First, select your project and ensure it starts in either Console or in IIS Express mode and press F5. Once the application is launched, you should see something like this:

windows-run

Now, select the docker-compose project and press F5. Another Window should open up and display something like this:

docker-run

The OS Description might not be exactly this but you should see “Linux” in there somewhere. And… that’s it!

You have officially a multiplatform .NET Core application running on your Windows 10 machine.

Conclusion

Without knowing anything about how docker works, we managed to create a .NET Core application and have it run in both Windows and Linux in less than 15 minutes.

Since, it’s not because you can than you should, I highly recommend that you read up on docker to ensure that it’s the proper tool for the job.

In fact, reading on the whole concept of containers would be advised before going with both feet in.

If you are interested in seeing how we can deploy this to the cloud, let me know in the comments!

Adding TFS to your Powershell Command Line

UPDATE: Added VS2017 support

If you are mostly working with other editors than Visual Studio but still want to be able to use TFS with your team mates, you will need a command line solution.

The first thing you will probably do is to do a Google Search and find where the command line utility is located.

C:\Program Files (x86)\Microsoft Visual Studio 14.0\Common7\IDE\tf.exe

Now, you could simply add the folder to your %PATH% and make it available to your whole machine. But… what about setting an alias instead? Basically, just import this specific command without importing the whole folder.

PowerShell

First, run this notepad $PROFILE. This will open your PowerShell profile script. If the file doesn’t exist, it will prompt you to create it.

Once the file is opened, copy/paste the following line:

1
Set-Alias tf "$env:VS140COMNTOOLS..\IDE\tf.exe"

If you have a different version of Visual Studio installed, you may need to change the version of the common tools.

This is easily the easiest way to get Team Foundation Services added to your command line without messing with your PATH variable.

Tools Versions

Name Version Tools Variable
Visual Studio 2010 10.0 VS100COMNTOOLS
Visual Studio 2012 11.0 VS110COMNTOOLS
Visual Studio 2013 12.0 VS120COMNTOOLS
Visual Studio 2015 14.0 VS140COMNTOOLS

Handling Visual Studio 2017

The way Visual Studio 2017 has been re-organized, there is no more global environment variables laying around.

The tf.exe location is now there. I haven’t found an easy way to link to it but to use the full path. Please note that the path bellow will vary based on your edition of Visual Studio.

C:\Program Files (x86)\Microsoft Visual Studio\2017\\Common7\IDE\CommonExtensions\Microsoft\TeamFoundation\Team Explorer\tf.exe

So for my scenario (with Enterprise installed), the alias would be set as:

1
Set-Alias tf "C:\Program Files (x86)\Microsoft Visual Studio\2017\Enterprise\Common7\IDE\CommonExtensions\Microsoft\TeamFoundation\Team Explorer\tf.exe"

Testing it out

If you run tf get on a source controlled folder, you should see changes be brought back to your folder.

Is there any other tools that you are using that are not registered in the default PATH? Leave a comment and let everybody know!

If you want to know more about how to use the tf command, you should definitely take a look at the list of commands.

TFVS Command Reference

Managed Disk is now in GA - Convert all your VMs now!

Alright so this is kind of a big deal. This has been covered in the past but since this just hit General Availability, you need to get on this now. Or better, yesterday if you have access to a time machine.

Before Managed disks, you had to create an Azure Storage Account for each VM to avoid IOPS limits. But this wasn’t enough to keep your VMs up and running. You had to also manage availability sets.

This has led a some people as far away from VM as possible. But if you consider the insane advantages of VM Scale Sets (read: massive scale-out, massive machine specs, etc.), you don’t want to avoid this card in your solution deck. You want to embrace it. But if you start embracing VMs, you have to start dealing with the Storage Accounts and the Availability Sets and, let’s be honest, it was clunky.

Today, no more waiting. It’s generally available and it’s time to embrace it.

Migrating Existing VMs to Managed Disks

Note this code is taken from the sources bellow.

To convert single VMs without an availability set

1
2
3
4
5
6
7
# Stop and deallocate the VM
$rg = "MyResourceGroup"
$vm = "MyMachine"
Stop-AzureRmVM -ResourceGroupName $rg -Name $vm -Force

# Convert all disks to Managed Disks
ConvertTo-AzureRmVMManagedDisk -ResourceGroupName $rg -VMName $vm

To Convert VMs within an availability set:

1
2
3
4
5
6
7
8
9
10
11
12
13
14
$rgName = 'myResourceGroup'
$avSetName = 'myAvailabilitySet'

$avSet = Get-AzureRmAvailabilitySet -ResourceGroupName $rgName -Name $avSetName

Update-AzureRmAvailabilitySet -AvailabilitySet $avSet -Managed

foreach($vmInfo in $avSet.VirtualMachinesReferences)
{
$vm = Get-AzureRmVM -ResourceGroupName $rgName | Where-Object {$_.Id -eq $vmInfo.id}
Stop-AzureRmVM -ResourceGroupName $rgName -Name $vm.Name -Force
ConvertTo-AzureRmVMManagedDisk -ResourceGroupName $rgName -VMName $vm.Name

}

Source 1
|
Source 2

Here’s some more resource that may help you convert your VMs.

If you are using the Azure CLI, they updated their tooling to allow you to manage the “Managed Disks”.

If you rather use C# to manage your application, the .NET Azure SDK is also up to date.

Finally, if you want to start playing with VM Scale Sets and Managed Disks, here’s a quick “how to”.

Are Managed Disks something that you waited for? Let me know in the comments!

Setting up ESLint rules with AngularJS in a project using gulp

When creating Single Page Application, it’s important to keep code quality and consistency at a very high level.

As more and more developer work on your code base, it may seem like everyone is using a different coding style. In C#, at most, it’s bothersome. In JavaScript? In can be down right dangerous.

When I work with JavaScript projects, I always end up recommending using a linter. This will allow the team to make decisions about coding practices as early as possible and keep everyone sane in the long run.

If you don’t know ESLint yet, you should. It’s one of the best JavaScript linter available at the moment.

Installing ESLint

If your project is already using gulp to automate the different work you have to do, eslint will be easy to setup.

Just run the following command to install all the necessary bits to make it run-able as a gulp task.

1
npm install eslint eslint-plugin-angular gulp-eslint

Alternatively, you could also just install eslint globally to make it available from the command line.

1
npm install -g eslint

Configuring ESLint

Next step is to create a .eslintrc.json at the root of your project.

Here’s the one that I use.

1
2
3
4
5
6
7
8
9
10
11
12
13
14
15
16
17
18
19
20
21
22
{
"env": {
"browser": true
}
,

"globals":{
"Insert Global Here": true
}
,

"extends": "angular",
"rules": {
"linebreak-style": [
"error",
"windows"
],

"semi": [
"error",
"always"
],

"no-console": "off",
"no-debugger": "warn",
"angular/di": [ "error", "$inject" ]
}

}

First, setting up the environment. Setting browser to true will import a tons of globals (window, document, etc.) that tells ESLint that the code is running inside a browser and not in a nodejs process for instance.

Next are globals. If you are using libraries that defines globals and that you are using those globals, it’s where you would define them. (Eg.: jQuery, $, _)

extends will allow you to define the base rules that we will follow. angular basically enables the plugin we have as well as all the basic JavaScript rules defined by default.

rules will allow you to customize the rules to your liking. Personally, I don’t like seeing the console and debugger errors so I adjusted them the way I like. As for angular/di, it allows you to set your prefered way of doing dependency injection with Angular. Anything that is not service.$inject = [...] will get rejected in my code base.

Sub-Folder Configuration

Remember that you can always add rules for specific folders. As an example, I often have a service folder. This folder only contains services but the rule angular/no-service-method will have an error for each of them.

Creating an .eslintrc.json file in that folder with the following content will prevent that error from ever showing up again.

1
2
3
4
5
{
"rules": {
"angular/no-service-method": "off"
}

}

Creating a gulp task

The gulp task itself is very simple to create. The only thing that is left to pick, is the format in which to display the errors.

You can pick from many formatters that are available.

1
2
3
4
5
6
7
8
var eslint = require("gulp-eslint");
var src = './app/';

gulp.task('eslint', function () {
return gulp.src(src + '**/*.js')
.pipe(eslint())
.pipe(eslint.format('stylish'));
});

Customizing your rules

As with every team I collaborate with, I recommend that everyone sits down and define their coding practices so that they may be no surprise.

Your first visit is to check the available rules on ESLint website. Everything with a checkmark is enabled by default and will be considered an error.

I wouldn’t take too much time going through the list. I would, however, run eslint on your existing code base and see what your team consider errors and identify cases where something should be errors.

  • Does extra-parenthesis gets on everyone’s nerves? Check out no-extra-parens
  • Does empty functions plaguing your code base? Check out no-empty-function
  • Do you consider using eval() a bad practice (you should!)? Add no-eval to the rulebook!

Improving your code one step at a time

By implementing a simple linter like ESLint, it’s possible to increase your code quality one step at a time. With the angular plugin for eslint, it’s also now possible to improve your Angular quality at the same time.

Any rules you think should always be enabled? What practices do you use to keep your code base clean and bug free? Let me know in the comments!

Angular 1.5+ with dependency injection and uglifyjs

Here’s a problem that doesn’t come too often.

You build your own build pipeline with AngularJS and you end-up going in production with your development version. Everything runs fine.

Then you try your uglified version and… it fails. For the fix, skip to the end of the article. Otherwise? Keep on reading.

The Problem

Here’s some Stack Trace you might have in your console.

Failed to instantiate module myApp due to:

Error: [$injector:unpr] http://errors.angularjs.org/1.5.8/$injector/unpr?p0=e

and this link shows you this:

Unknown provider: e

Our Context

Now… in a sample app, it’s easy. You have few dependencies and finding them will make you go through a few files at most.

My scenario was in an application with multiple developers after many months of development. Things got a bit sloppy and we made decisions to go faster.

We already had practices in place to require developers to use explicit dependency injection instead of implicit. However, we didn’t have anything but good faith in place. Nothing against human mistake or laziness.

Implicit vs Explicit

Here’s an implicit injection

1
2
3
4
angular.module('myApp')
.run(function($rootScope){
//TODO: write code
});

Here’s what it looks like explicitly (inline version)

1
2
3
4
angular.module('myApp')
.run(['$rootScope', function($rootScope){
//TODO: write code
}]);

Why is it a problem?

When UglifyJS will minify your code, it will change variable names. Names that AngularJS won’t be able to match to a specific provider/injectable. That will cause the problem we have where it can’t find the right thing to inject. One thing that UglifyJS won’t touch however is strings. so the '$rootScope' present in the previous tidbit of code will stay. Angular will be able to find the proper dependency to inject. And that, even after the variable names get mangled.

The Fix

ng-strict-di will basically fails anytime it finds an implicit declaration. Make sure to put that into your main Angular template. It will save you tons of trouble.

1
2
3
<html ng-app="myApp" ng-strict-di>
...
</html>

Instead of receiving the cryptic error from before, we’ll receive something similar to this:

Uncaught Error: [$injector:modulerr] Failed to instantiate module myApp due to:

Error: [$injector:strictdi] function(injectables) is not using explicit annotation and cannot be invoked in strict mode

Enable Transparent Data Encryption on SQL Azure Database

Among the many recommendations to make your data secure on Azure, one is to implement Transparent Data Encryption.

Most of the ways you’ll see online to enable it is to run the following command in SQL:

1
2
3
-- Enable encryption  
ALTER DATABASE [MyDatabase] SET ENCRYPTION ON;
GO

While this may be perfectly valid for existing database, what if you want to create it right from the start with TDE enabled?

That’s where ARM templates normally come in. It’s also where the documentation either fall short or isn’t meant to be used as-is right now.

So let me give you the necessary bits for you to enable it.

Enabling Transparent Data Encryption

First, create a new array of sub resources for your database. Not your server. Your database. It’s important otherwise it just won’t work.

Next, is to create a resource of type transparentDataEncryption and assign the proper properties.

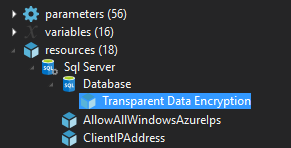
It should look like this in your JSON Outline view.

Enabling Transparent Data Encryption on Azure

I’ve included the database ARM template I use for you to copy/paste.

ARM Template

1
2
3
4
5
6
7
8
9
10
11
12
13
14
15
16
17
18
19
20
21
22
23
24
25
26
27
28
29
30
31
32
33
34
35
{
"name": "[variables('databaseName')]",
"type": "databases",
"location": "[resourceGroup().location]",
"tags": {
"displayName": "Database"
}
,

"apiVersion": "2014-04-01-preview",
"dependsOn": [
"[concat('Microsoft.Sql/servers/', variables('sqlserverName'))]"
],

"properties": {
"edition": "[parameters('edition')]",
"collation": "[parameters('collation')]",
"maxSizeBytes": "[parameters('maxSizeBytes')]",
"requestedServiceObjectiveName": "[parameters('requestedServiceObjectiveName')]"
}
,

"resources": [
{
"name": "current",
"type": "transparentDataEncryption",
"dependsOn": [
"[variables('databaseName')]"
],

"location": "[resourceGroup().location]",
"tags": {
"displayName": "Transparent Data Encryption"
}
,

"apiVersion": "2014-04-01",
"properties": {
"status": "Enabled"
}

}

]
}

Want more?

If you are interested in more ways to secure your data or your application in Azure, please let me know in the comments!

Microsoft Azure Dashboards quick tips

Dashboards are a fantastic way of monitoring applications. However, most people don’t really know how to benefit from them.

All screenshots are from when you view your dashboard in Edit Mode (after clicking Edit Dashboard)

Markdown tiles

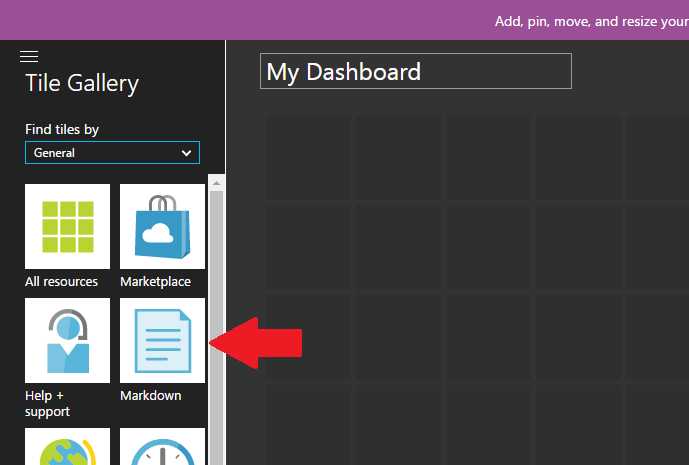
Those are readily accessible under General in the Tile Gallery blade.

Markdown tile

Drag and dropping will allow you to set a Title, Subtitle as well as content.

This fits perfectly well with the next feature.

Deep linking resources

Let’s say I want to link to an AppService webjobs but I don’t want to have the whole widget. Or maybe I just want to see the deployment list. Not just the active one.

You could spend the five minutes to search and add the widget which will increase the load time or… you could just create a link to it.

Want to direct-link to an AppService console?

https://portal.azure.com/#resource/subscriptions/{Subscription_Id}/resourceGroups/{Resource_Group_Name}/providers/Microsoft.Web/sites/{Site_Name}/console

Want to direct-link to the AppService Deployment Options?

https://portal.azure.com/#resource/subscriptions/{Subscription_Id}/resourceGroups/{Resource_Group_Name}/providers/Microsoft.Web/sites/{Site_Name}/DeploymentSource

Basically, just navigate to where you want to go, copy the link and you are almost done.

Use the previous trick to create a markdown tile and add links to your desired locations and you now have instant navigation to the exact feature you want to manage.

Sharing Dashboards

Now that you made that awesome dashboard full of custom links and useful widgets… what about sharing it so others don’t have to build one themselves?

It is possible to Share a dashboard by saving them through a resource group. By default, it will try to save them in a dashboards resource group but they can also be saved within existing resource group.

This allows you to easily share carefully crafted dashboards with other members of the team.

This can be accessed with a link right beside the Edit Dashboard button.

If you are interested in deploying templates with ARM in the future, I would keep an eye on this issue on GitHub.

If you want to try the undocumented way (which may break in the future), check out this blog post.

If you want to UnShare a dashboard, just navigate to the dashboard and click Share again and press on UnPublish.

Do you want more?

Is that a subject that you would be interested in? Do you want more tips and tricks about the Azure Portal and useful dashboard configurations?

Please let me know in the comments!

Azure Day is coming to Montreal January 17th 2017

If you are in Montreal around mid-January, Microsoft is hosting an awesome event called Azure Day.

What is Azure Day?

Azure Day is a 12 hours hands-on workshop centered on different services offered in Azure like IoT, Machine Learning and DevOps.

What subjects are going to be approached?

Data

  • Internet of Things
  • Machine Learning

DevOps

  • Continuous Integration
  • Continuous Deployment
  • Infrastructure as code
  • Microservices with Azure Container Services or Docker Swarm
  • Automated Security
  • A/B Testing

.NET

  • .NET Core
  • .NET 4.5

With all those subjects, if you don’t want to miss out, remember to Register and mention which of the following block you would like to book:

Azure Day Schedule

Resolved: AppInsights moved to EastUS, deployment failing with CentralUS message

TLDR AppInsights were moved to EastUS. AutoScale Settings and Alerts were kept in CentralUS causing a chain-reaction of failure all around. Code to clean-up available at end of post.

As AppInsights hit General Availability at Microsoft Connect 2016, a few issues were introduced that caused our VSTS builds to start failing. Here’s the message that we got:

1
2016-11-18T19:25:33.9545678Z [Azure Resource Manager]Creating resource group deployment with name WebSiteSQLDatabase-20161118-1925
2016-11-18T19:25:37.8711397Z ##[error]The resource 'myresource-int-myresource-int' already exists in location 'centralus' in resource group 'myresource-int'. A resource with the same name cannot be created in location 'East US'. Please select a new resource name.
2016-11-18T19:25:37.9071426Z ##[section]Finishing: Azure Deployment:Create Or Update Resource Group action on eClientRcgt-int

So I started debugging. After a few days trying to get this issue fixed, I decided to generate the template from the portal. Looked up the myresource-int-myresource-int inside of it and found out that it was an automatically generated name for Microsoft.insights/autoscalesettings. The worse was… its location was Central US. And it was not alone.

Other Alert rules were also located in Central US and just fixing the autoscalesettings would get me other error messages.

Of course, there’s no easy way in the portal to delete those. However, with PowerShell, it’s trivial.

It is important to note that it’s perfectly safe to delete them on our end since we deploy with Azure Resource Manager templates. They will be recreated at the next CI/CD run.

Here’s the quick code to delete them if you encounter this issue.

1
2
3
4
$resource = Get-AzureRmResource
$rgn = 'resourceGroup'
$resource | where { $_.ResourceType -eq 'Microsoft.insights/autoscalesettings' -and $_.Location -eq 'centralus' -and $_.ResourceGroupName -eq $rgn } | Remove-AzureRmResource
$resource | where { $_.ResourceType -eq 'Microsoft.insights/alertrules' -and $_.Location -eq 'centralus' -and $_.ResourceGroupName -eq $rgn } | Remove-AzureRmResource

Cleaning up Azure Resource Manager Deployments in Continuous Integration Scenario

When deploying with Azure Resource Manager Templates (aka: ARM Templates), provisioning an environment has never been that easy.

It’s as simple as providing a JSON file that represent your architecture, another JSON file that contains all the parameters for this architecture and boom. Online you go.

Personally, I hate deploying from Visual Studio for anything but testing. Once you start delivering applications, you want something centralized, sturdy and battle tested. My tool of choice is Visual Studio Team Services. VSTS integrates perfectly with Azure with tasks to Create/Upgrade ARM templates on an Azure Subscription.

Our current setup includes 4 environments and 4-5 developers. One of this environment is a CI/CD environment. Every single check-in that happens in a day will be deployed. So our resource group is also being updated like crazy. Just to give you numbers, 50 deployments in a day hasn’t been unheard of.

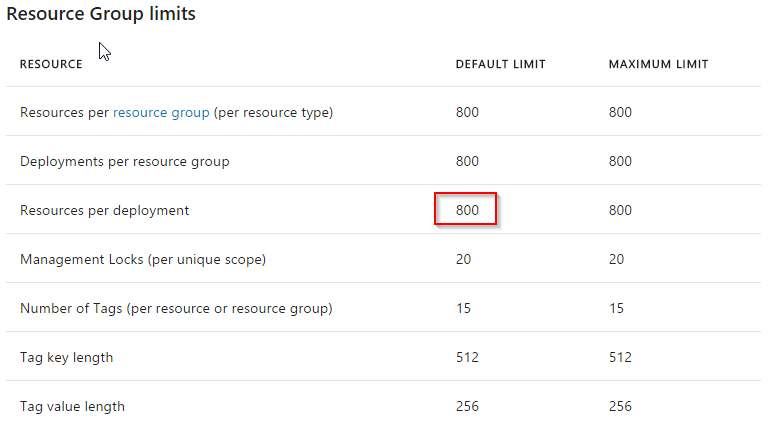
The problem, is the Azure Resource Manager Deployment limit.

Azure Resource Manager Deployment Limit

So … 800 eh? Let’s make a calculation. 20 deployments per day, 20 workable day in a week… 400 deployments per months.

2 months. That’s how long before we run into an error when deploying on Azure. I’ve already raised the issue with one of the developers over at Microsoft but in the mid-time, I need to clear this!

Many ways to do this.

The Portal

Oh boy… don’t even think about it. You’ll have to do them one by one. There’s nothing to multi-select. And you’ll need to do that every month/2 months.

Everything that is repeating itself is worth automating.

Powershell - Normal way

I’ve tried running the following command:

1
2
$resourceGroupName = "MyResourceGroup"
Get-AzureRmResourceGroupDeployment -ResourceGroupName $resourceGroupName | Remove-AzureRmResourceGroupDeployment -ResourceGroupName $resourceGroupName

The problem with this is that each deployment is going to be deleted synchronously. You can’t delete in batch. With 800 deployments to clean up, it took me hours to delete a few hundreds before my Azure Login Powershell session expired and crashed on me.

Powershell - The Parallel way

Powershell allows for parallel commands to be run side by side. It run those commands in separate sessions in a separate Powershell process.

When I initially ran this command, I had about 300 deployments to clean on one of my resource group. This, of course, launched 300 powershell.exe processes that executed to required commands.

1
2
3
4
5
6
7
8
9
10
11
12
13
14
15
$path = ".\profile.json"
Login-AzureRmAccount
Save-AzureRmProfile -Path $path -Force

$resourceGroupName = "MyResourceGroup"
$deployments = Get-AzureRmResourceGroupDeployment -ResourceGroupName $resourceGroupName
$deploymentsToDelete = $deployments | where { $_.Timestamp -lt ((get-date).AddDays(-7)) }

foreach ($deployment in $deploymentsToDelete) {
Start-Job -ScriptBlock {
param($resourceGroupName, $deploymentName, $path)
Select-AzureRmProfile -Path $path
Remove-AzureRmResourceGroupDeployment -ResourceGroupName $resourceGroupName -DeploymentName $deploymentName
} -ArgumentList @($resourceGroupName, $deployment.DeploymentName, $path) | Out-Null
}

Then you have to keep track of them. Did they run? Did they fail? Get-Job will return you the list of all jobs launched in this session. The list may be quite extensive. So let’s keep track only of those running:

1
(Get-Job -State Running).Length

If you want to only see the results of the commands that didn’t complete and clear the rest, here’s how:

1
2
3
4
5
6
7
8
9
10
11
# Waits on all jobs to complete
Get-Job | Wait-Job

# Removes the completed one.
Get-Job -State Completed | Remove-Job

# Output results of all jobs
Get-Job | Receive-Job

# Cleanup
Get-Job | Remove-Job

The results?

Instead of taking overnight and failing on over half the operations, it managed to do all of those in a matter of minutes.

The longest run I had on my machine was 15 minutes for about 300 deployments. Always better than multiple hours.

If you create a Powershell that automate this task on a weekly basis, you won’t have to wait so long. If you include Azure Automation in this? You’re good for a very long time.

Yarn 0.17 is out. Time to ditch npm.

Defenestrating npm. Original: http://trappedinvacancy.deviantart.com/art/Defenestration-115846260

Original by TrappedInVacancy on DeviantArt.

If you were avoiding Yarn because of its tendencies to delete your bower folder, it’s time to install the latest.

Among the many changes, it removes support for bower. So yarn is truly a drop in replacement for npm now.

To upgrade:

1
npm install -g yarn

Ensure that yarn --version returns 0.17. Then run it against your code base by simply typing this:

1
yarn

Only thing you should see is a yarn.lock file.

Wait… why should I care about yarn?

First, yarn freezes your dependency when you first install them. This allows you to avoid upgrading sub-sub-sub-sub-sub-sub-sub-sub dependency that could break your build because someone down the chain didn’t get semver.

The lock file is alphabetically ordered YAML and automatically generated when running yarn. Every time this file change, you know your dependencies changed. As simple as that. Not only that, it also freezes all child dependencies as well. That makes build process repeatable and non-breaking even if someone decides that semver is stupid.

Second, yarn allows for interactive dependency upgrade. Just look at this beauty.

Interactive Upgrade!

Cherry picking your upgrade has never been easier. If include yarn why <PACKAGE NAME> which gives you the reason for a package’s existence, yarn truly allows you to see and manage your dependencies with ease.

Finally, yarn will checksum and cache every packages it downloads. Even better for build servers that always re-install the same packages. Yarn also install/download everything in parallel. Everything to get you fast and secure builds for this special Single Page Application you’ve been building.

If you want the whole sales pitch, you can head read so on Facebook’s announcement’s page.

What about you?

What is your favorite Yarn feature? Have you upgraded yet? Leave me a comment!

Do not miss Microsoft Connect 2016

Whether your focus is on .NET, .NET Core, or Azure…

You do not want to miss Connect 2016.

So what should you watch?

I’m an architect or business oriented

Watch Day 1. All the big announcements are going to be condensed in this day. If you have something to relay to the business or need to know Microsoft’s direction for the foreseeable future? It’s where you’ll get that information.

I’m a developer/architect or just love the technical details

You’ll want to add Day 2 to the mix. That’s where all the cool stuff and how to use it will be shown. I’m expecting lots of cool demos with good deep dives in a few features.

If you are an Azure developer? You’re in luck. There’s at least 2 hours dedicated to Azure without even talking about all the details about VSTS or Big Data.

If you want to put into practice what you’ve seen, hit Day 3 with some Microsoft Virtual Academy.

What should I expect?

As Azure is a continuously evolving platform, I would expect a lot of (small and big) announcements. Service Fabric was launched in Public Preview last year so I would hope to see an update on that.

With Microsoft Graph launching at last year’s Connect and Microsoft Team being launched just recently, I’m hoping to see some integration on those two products.

As for Visual Studio and .NET Core, if you haven’t been following the GitHub repository, something something about the new project system. Nothing hidden here. But I’ll leave some high quality demo blow your mind away. I’m also expecting some news about either a Visual Studio Update or VS15 which has been in Preview for quite a while now (Preview 5 being last October).

For UWP? I’m really hoping to see the future of that platform. Windows Phone is a great platform and the first step for Microsoft in the mobile space. UWP is the unified concept of One Application everywhere. I would love to see their vision there.

What about you?

What are YOU expecting? What do you hope in seeing?

Are your servers really less expensive than the cloud?

I’ve had clients in the past that were less than convinced by the cloud.

Too expensive. Less control and too hard to use.

Control has already been addressed by Troy Hunt before and I feel that it translate very well to this article.

As for the difficulty to use the cloud, it’s seriously just a few clicks away in Visual Studio or a GitHub synchronization.

That leaves us with pricing which can be tricky. Please note that the prices were taken at the time of writing and will change in the future.

Too expensive

On-Premise option

When calculating the Total Cost of Ownership (TCO) of a server, you have to include all direct, indirect and invisible costs that goes into running this server.

First, there’s the server itself. If I go VERY basic with one machine, I can get one for $1300 or $42/months over 36 months with financing. We’re talking bare metal server here. No space or RAM for virtualization. I could probably get something cheap at Best Buy but at that point, it’s consumer-level quality no warranty on business usage. If you are running a web server and a database, you want those to be on two distinct machine.

Then, unless you have the technical knowledge and time to setup a network, configure the machine, secure them you will have to pay someone to pay for this. We’re talking either $100/hours of work or hiring someone who can do the job. Let’s assume you have a consultant come over for 2 days’ worth to help you set that up (16 hours). Let’s add 5 hours per years to deal with updates, upgrades and other.

Once that server is configured and ready to run, I hope you have AC to keep it cool. Otherwise, your 36 months investment may have components break sooner rather than later. If you don’t have it “on-site” but rather rent a space in a colocation area, keep that amount in mind for the next part.

Now let’s do a run down. $1300 per server, 16 hours at $100 per hours (with 5 hours per years to keep the machine up and running), add the electrical cost of running the server, the AC or a colocation rent.

Over 36 months, we’re at $158 per months + electrical / rent. I haven’t included cost of backups or any other redundancies.

Cloud Option

Let’s try to get you something similar on the cloud.

First thing you will need is a database. On Azure, a standard S1 database will run you at $0.403/hours or about $30 per months. Most applications these days require a database so that goes without saying.

Now you need to host your application somewhere. If you want to handle everything from network to Windows Updates, a Standard A1 virtual machine will run you at $0.090/hours or $67 per months.

But let’s be real here. If you are developing an API or a Web Application, let’s drop having to manage everything. Let’s check AppServices. You can get a Basic B1 instance for $0.075/ hours or $56 per months.

What does AppServices brings you however is no Windows Updates. Nothing to maintain. Just make sure your app is running and alive. That’s your only responsibility.

With Azure, running with Virtual Machines will cost you a bit less than $100 per months and AppServices at around $86 per months.

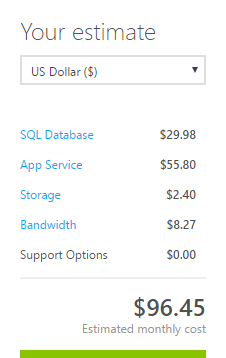
Let’s say I add 100Gb of storage and 100Gb of bandwidth usage per months and here’s what I get.

Estimate for AppServices

Fine prints

If you analyze in details what I’ve thrown at you in terms of pricing, you might see that an On-Premise server is way more powerful than a Cloud VM. That is true. But in my experience, nobody is using 100% of their resources anyway. If you do not agree with me, let’s meet in the comments!

Here’s what’s not included in this pricing. You can be hosted anywhere in the world. You can start your hosting in United States but find out that you have clients in Europe? You can either duplicate your environment or move it to this new region without problems. In fact, you could have one environment per region without huge efforts on your end. Depending on the plans you picked, you can load balance or auto-scale what was deployed on the cloud. Impossible to do with On-Premise without waiting for new machines. Since you can have more than one instances per region and multiple deployment over many regions, your availability becomes way higher than anything you could ever achieve alone. 99.95% isn’t impossible. We’re talking less than 4.5 hours of downtime per year or less than 45 seconds every day. With a physical server, one busted hard-drive will take you down for at least a day.

Take-away notes

That you agree or not with me, one thing to take away is to always include all costs.

Electricity, renting space, server replacement, maintenance, salary, consulting costs, etc. All must be included to fairly compare all options.

Summary

Some things should stay local to your business. From your desktop computers to your router, those need to stay local. But with tools like Office 365, which takes your email/files to the cloud, and Azure, which takes your hosting to the cloud. Less and less elements require a proper local server farm anymore.

Your business or your client’s business can literally run off of somebody else’s hardware.

What do you think? Do you agree with me? Do you disagree? Let me know in the comments.

Atom: Adding Reveal in TreeView with the ReSharper Locate File Shortcut

There’s one feature I just love about ReSharper is the Locate File in Solution Explorer in Visual Studio.

For me, Visual Studio is too heavy for JavaScript development. So I use Atom and I seriously missed this feature.

Until I added it myself. With 2 lines of code declaration.

1
2
'atom-text-editor':
'alt-shift-l': 'tree-view:reveal-active-file'

To add this to your shortcuts, just go in File > Keymap... and paste the above in the opened file.

What other shortcuts are you guys using?

The Lift and Shift Cloud Migration Strategy

When migrating assets to the cloud, there are many ways to do it. Nothing is a silver bullet. Each scenario needs to be adapted to our particular situations.

Among the many ways to migrate current assets to a cloud provider, one of the most common is called Lift and Shift.

Lift and shift

TLDR; You want the benefit of the cloud, but can’t afford the downtime of building for the cloud.

The lift and shift cloud migration strategy are to take your local assets (mostly on VMs or pure VMs) and just move them to the cloud without major changes in your code.

Why lift and shift?

Compared to the alternatives of building for the cloud, called Cloud Native, or refactor huge swath of your application to better use the cloud, it’s easy to see why. It just saves a lot of developer hours.

When to lift and shift?

You want to do a lift and shift when your application architecture is just too complex to be Cloud Native or that you don’t have the time to convert it. Maybe you have a 3rd party software that needs to be installed on a VM or that the application assumes that it controls the whole machine and requires elevation. In those scenarios, where re-architecting big parts of the application are just going to be too expensive (or too time consuming), a lift and shift approach is a good migration strategy.

Caveats

Normally, when going to the cloud, you expect to save lots of money. At least, that’s what everybody promises.

That’s one of the issues with a lift and shift. This isn’t the ideal path to save a huge amount of money quickly. Since you will be billed in terms of resources used/reserved, and if your Virtual Machines are sitting there doing nothing, it would be a good idea to start consolidating a few of them. But besides the cost, the move should be the most simple of all migration strategies.

You’ll still need to manage your Virtual Machine and have them follow your IT practices and patching schedule. Microsoft will not manage those for you. You are 100% in control of your compute.

Gains

It is, however, one way to reach scalability that wasn’t previously available. You are literally removing the risk with handling your own hardware and putting it on your cloud provider. Let’s be honest here, they have way more money in the infrastructure game to ensure that whatever you want to run, it will. They have layers upon layers of redundancy from power to physical security. Data centers have certifications that would cost you millions to get. With Azure, you can get this. Now.

So stop focusing on hardware and redundancy. Start focusing on your business and your company’s goal. Unless you are competing in the same sphere as Microsoft and Amazon, your business isn’t hosting. So let’s focus on what matters. Focus on your customers and how to bring them value.

With some change to the initial architecture, you will also be able to scale out (multiple VMs) your application servers based on a VM’s metric. Or with no changes to the architecture, you can increase (or lower) the power of the VM with just a few click from the Portal or a script. It’s the perfect opportunity to save money by downgrading a barely used Application Server or shutting down unused machines during off-hours.

This can definitely bring you and edge where a competitor would have to build a new server to allow for expanding their infrastructure. You? You get those on demand for how long or how short you need them.

The capability to scale and the reliability of the cloud are the low hanging fruits and will be available to pretty much all other cloud migration strategy and with all cloud providers.

When to re-architecture

Massive databases

We used to put everything in a database. I’ve seen databases in gigabytes or even terabytes territory. That’s huge.

Unless those databases are Data Warehouses, you want to keep your database as slim as possible to save money and gain performance.

If you are storing images and files in an SQL database, it might be time to use Azure Blob Storage. If you have a Data Warehouse, don’t store it in SQL Azure but rather store it in Azure SQL Data Warehouse.

Big Compute

If you are processing an ungodly amount of images, videos or mathematical models on a VM, it’s time to start thinking High-Performance Computing (HPC).

Of course, lift and shifting your VM to the cloud is a nice temporary solution but most likely, you aren’t using those VMs 100% of the time they are up. When they are up, they make take longer to run the task than you might like.

It’s time to check Azure Batch, Cognitive Services (if doing face recognition) or even Media Services if you are doing video encoding.

Those services allow you to scale to ungodly level to match your amount of work. Rather than keeping your VMs dedicated to those workloads, taking the time to refactor the work to be done so that they can better leverage Azure Services will allow you to improve your processing time and reduce the amount of maintenance on those machines.

Small Web Applications

Do you have small web applications with one small database hooked on an IIS Server on your network? Those are an excellent candidate to be moved to an Azure WebApp.

If your application has low traffic, low CPU/memory usage and is sitting with many other similar apps on a VM, they are the perfect scenario for a refactoring to Azure App Services.

Those applications can be put on a Basic App Service Plan and share computing resources. If one of those apps is suddenly more resources intensive, it takes 10 minutes to give it its own computing resources.

Even the database themselves are the perfect case to move to an Azure SQL Elastic Pool where database shares their compute.

With the proper tweaking, it’s possible to gain all the benefits of simple website hosting without having to handle the VMs and their maintenance.

What’s next

There’s many ways to evolve once your old legacy servers are in a VM on Azure.

Going with containers is one of the many solutions. Of course, if you already have containers internally, your lift and shift to Azure should be about as painless as can be. If you are not, it will make your life easier by identifying the dependencies your old applications were using. This would allow you to leverage the cloud reliability and scalability without changing too much.

Without containers, consider Azure Site Recovery to automate replication of VMs on the cloud.

For certain application going Cloud Native is definitely going to save you more money as you adapt your application to only use the resources it needs. By using Blob Storage instead of the file system, NoSQL storage where it makes sense and activating auto scaling, you will be able to save money and run a leaner business.

Do you agree? Are there scenarios that I missed? Please comment bellow!