1-Click Deployment of Cognitive Services with ARM Templates

I’ve been using Cognitive Services for a while now. I’m creating AI services for hackathons, personal projects, or actual work.

One of the scenarios I’m always facing is to create the service initially. It requires you first to find the right service, then chooses a region, then a pricing tier. Could all of this be made simpler? I think so!

If, like me, you are only using the free tier and are trying to publish into an EastUS/WestUS region, then I’m ready to show you how to do this!

There is a feature in Azure that allows us to create templates for resources. They are called Azure Resource Manager Templates. They are also known as ARM Templates. At a bare minimum, those templates are a combination of a template file and a parameter file.

The template file defines the resources that we need to create while the parameters allow you to set variables at deployment time. You can use the template directly with the Azure Portal and fill the parameters there. Alternatively, you can create a set of parameters in a file and deploy those resources with a Command-Line. Isn’t that powerful?

The best use for us at the moment, however, is to reduce the number of choices. We’re going to build a single-click deployment option for us to use later on.

Let me show you the repository I created for One-Click Cognitive Services deployment.

Let’s take a look at our templates to identify how we are deploying them.

1
2
3
4
5
6
7
8
9
10
11
12
13
14
15
16
17
18
19
20
21
22
23
24
25
26
27
28
29
30
31
32
33
34
35
36
37
38
39
{
"$schema": "https://schema.management.azure.com/schemas/2019-04-01/deploymentTemplate.json#",
"contentVersion": "1.0.0.0",
"parameters": {
"baseName": {
"type": "string",
"defaultValue": "computervision"
}
,

"location": {
"type": "string",
"defaultValue": "eastus",
"allowedValues": ["eastus", "westus"]
}
,

"apiType": {
"type": "string",
"defaultValue": "ComputerVision",
"allowedValues":["ComputerVision"]
}
,

"sku": {
"type": "string",
"defaultValue": "F0"
}

}
,

"resources": [
{
"apiVersion": "2017-04-18",
"name": "[concat(parameters('baseName'), uniqueString(resourceGroup().id))]",
"location": "[parameters('location')]",
"type": "Microsoft.CognitiveServices/accounts",
"kind": "[parameters('apiType')]",
"sku": {
"name": "[parameters('sku')]"
}
,

"properties": {
"customSubDomainName": "[concat(parameters('baseName'), uniqueString(resourceGroup().id))]"
}

}

]
}

There’s a lot to unpack here. There are 3 sections in that file: parameters, variables, and resources. We’re not going to use the variables, and parameters is self-describing. Let’s look at resources.

First, it’s an array, which means that we are can create multiple resources at the same time. For the resource we selected, Computer Vision, let’s look at the resource structure.

Excluding whitespaces and sub-properties, there are only around seven meaningful lines in there. Let’s go through them.

apiVersion is representing the version of the resource provider we use internally. It affects the available properties and schema.

name is representing your resource name. Here, we are building a unique name using the uniqueString function to ensure we’re not creating duplicates within a same Resource Group.

location is representing the deployed region of the service. From the default values, we are only letting EastUS and WestUS as options. For a complete list of locations, here’s the reference page.

type is representing the actual service we are deploying. For Cognitive Services, it’s all the same type. The attribute kind specify which service we want.

kind is representing what kind of cognitive services we want to deploy. There are many available and is listed by running the Azure CLI command az cognitiveservices account list-kinds -o table

sku is representing the amount we want to pay. We are selecting F0 here by default since we want the free option.

customSubDomainName represents the domain name we can enable for token authentication.

With that, we can deploy cognitive services with the click of a button within any subscription on Azure.

If you are interested in a follow-up article, please let me know in the comments or on Twitter.

November 2019 .NET/ASP.NET Documentation Update

TLDR; This is a status update on the .NET documentation. If you want me to do more of those (once a month), please let me know in the comments!

Comment: If you have suggestions, please let me know in the comments. Any product feedback will be forwarded to the proper product team.

Hi everyone!

So the .NET Core 3.1 has finally released in the last few days, so expect lots of things related to this.

This update covers everything that happened since November 1st through December 4th. Although not everything has yet been updated for 3.1, expect a lot more coming next month!

If you still don’t know me, my name is Maxime Rouiller and I’m a Cloud Advocate with Microsoft. For this month, I’m covering three major products:

You’ll find a nice legend below that explains and highlights articles that I think deserves special attention.

Legend

  • 📢: Major/Main article that everyone will want to read
  • 💥: Important/Must read.
  • ✨: Brand new page

Note: It’s not because a page doesn’t have an icon that it isn’t important. Everything here is either brand new or significantly modified.

Themes this month

  • .NET
    • System.Text.Json documentation
    • C# 8.0 Updates
    • C# 8.0 Spec updates
    • New C# landing page
    • New API docs
    • SameSiteMode updates
  • ASP.NET
    • React to identified problems with the 3.0 release
    • Article updates for 3.0
    • SameSiteMode updates

.NET

JSON

API docs

We’ve added documentation for 444 APIs.

SameSiteMode updates:

.NET Core

Compatibility

Installation

The old prerequisites articles were removed and in their place the following articles were created:

Runtime Configuration

Testing

Tooling

C\

Desktop guide - WPF

F\

.NET for Apache Spark guide

ML.NET

ASP.NET Core

Blazor

Performance

Security

Fundamentals

Host and Deploy

MVC

SignalR

October 2019 .NET/ASP.NET Documentation Update

TLDR; This is a status update on the .NET documentation. If you want me to do more of those (once a month), please let me know in the comments!

Comment: If you have suggestions, please let me know in the comments. Any product feedback will be forwarded to the proper product team.

Question: Should I add Entity Framework in this update as well? Let me know in the comments.

Hi everyone!

So the .NET Core 3.0 has released, things have settled down a bit and we’re ready to start the fifth month of this .NET-related documentation update. This update covers everything that happened since October 1st through November 5th.

My name is Maxime Rouiller and I’m a Cloud Advocate with Microsoft. For this month, I’m covering three major products:

As with last month, here’s the legend that I will use to mark certain article with certain level of important. Much more useful than writing a blurb beside each one. I know, we’re not Twitter. Dare I say I’m using emojis for good? \

Legend

  • 📢: Major/Main article that everyone will want to read
  • 💥: Important/Must read.
  • ✨: Brand new page

Note: It’s not because a page doesn’t have an icon that it is not important. Everything here is either brand new or significantly modified.

Themes this month

  • CLI updates to .NET Core
  • docsfx.json plumbing work
  • C# 8.0 updates
  • C# 8.0 spec updates

.NET Fundamentals

.NET Core

Tools updates for 3.0

Compatibility

Diagnostics CLI tools

C# articles

C# Language Reference

Visual Basic

.NET APIs

ML.NET

.NET for Apache Spark

Blazor for ASP.NET Web Forms developers e-book

ASP.NET Core

gRPC

Blazor

Fundamentals

Host and deploy

Migration

MVC and Web API

Performance

Razor Pages

Security

SignalR

NuGet

September 2019 .NET/ASP.NET Documentation Update

TLDR; This is a status update on the .NET documentation. If you want me to do more of those (once a month), please let me know in the comments!

Comment: If you have suggestions, please let me know in the comments. Any product feedback will be forwarded to the proper product team.

Hi everyone!

This is the fourth month where I post a summary of all .NET-related documentation that was significantly updated. This month covers all changes from September 1st to September 27th.

My name is Maxime Rouiller and I’m a Cloud Advocate with Microsoft. For this month, I’m covering three major products:

For this month, I’ll be trying something new. I will not be leaving a comment beside each article and will instead use a Legend with emojis (I know, it’s Reddit. What am I doing!?). Thing is, it’s easier to show you what’s what than explain it. Where relevant, I will leave notes.

Legend

  • 📢: Major/Main article that everyone will want to read
  • 💥: Important/Must read.
  • ✨: Brand new page

Note: It’s not because a page doesn’t have an icon that it is not important. Everything here is either brand new or significantly modified.

Themes this month

.NET Core 3.0

  • What’s new for Preview 9 and GA release
  • JSON serialization
  • CLI updates

Managed Languages

.NET Core

E-book - Blazor for Web Forms Developers (Preview) ✨

Are you a Web Forms developer? This book is brand new and will help you bridge your knowledge between Web Forms and Blazor.

More content should be coming in the next few months.

❗ Don’t forget that you can download all e-books with the Download PDF button in the bottom left of your screen (desktop) or through the Content menu if you are on mobile. ❗

E-book - Architecting Cloud Native .NET Applications for Azure (Preview)

Are you a developer, a lead or even an architect? Do you want to know how to build an application that is made for the cloud?

This is the book for you.

❗ Don’t forget that you can download all e-books with the Download PDF button in the bottom left of your screen (desktop) or through the Content menu if you are on mobile. ❗

E-book - ASP.NET Core gRPC for WCF Developers (Preview) 💥✨

Lots of you have asked me last month about how to handle gRPC coming from a WCF point of view. Well, this month is your time to shine. There’s a literal book being currently written about it. The whole thing is brand new and is aimed at developers that were, surprise surprise, using WCF before.

This book takes you from migration, load balancing, Kubernetes, error handling, security, and to why even use it. It’s a must-read.

❗ Don’t forget that you can download all e-books with the Download PDF button in the bottom left of your screen (desktop) or through the Content menu if you are on mobile. ❗

Compatibility 💥

When you’re upgrading your app from one version of .NET Core to another, you might be interested to know if there were any compatibility changes introduced that could impact your app. The list is not final yet so there will be more breaking changes added in the next few months. You have the option to look at them by version or feature area:

Desktop Guide for Windows Presentation Foundation (WPF) 💥✨

We’re revamping the WPF content and giving it a new home called “Desktop Guide”. This guide will cover WPF for both .NET Core and .NET Framework, with an emphasis on .NET Core. This guide will continue to grow over time as the team modernizes and bring more relevant content into it.

Whether you like XAML or not, it’s a good thing to remember as there are tons of WPF applications in the wild and your chances of encountering one is mostly guaranteed.

This guide may save you some time in the future.

.NET Framework

Updates to the actual .NET Framework content. Not Core related.

.NET Guide - Assemblies in .NET

Everything you ever wanted or didn’t want to know about assemblies in .NET. To sign or not to sign isn’t the question. Did you know? That is the question.

The assemblies content used to be in the .NET Framework guide and was now moved to where our .NET Fundamentals content live. It’s now applicable to both .NET Framework and .NET Core.

Tooling, tutorial, serialization, exceptions, and others

Machine learning tutorial? Yes. We haven’t gotten enough of them that’s for sure. Machine learning is becoming omnipresent and starting with a tutorial sure is a good way to learn.

The JSON serializer is brand new. Have you tried it? Those articles are your perfect start to understanding how it works. Including the most fun data type to serialize, DateTime and DateTimeOffset.

With the new tooling and .NET being used on the daily, you’re bound to run into issues. The first article handles the possible issues you might run into. The second shows you how to make localized exception messages. Neat 🤖📷.

.NET APIs

?????????

ASP.NET Core

Blazor

If you are now reading this, it’s because you are a fan of WebAssembly(aka WASM). Enjoy this small update.

Server-side Blazor has hit GA while the client-side is still in Preview.

Fundamentals

Lots of fundamental articles have been updated to the 3.0 release.

You will find here updated articles, samples, and general tidying of articles (typos, more snippets, clarifications).

gRPC

So you’re not the book kind of developer. You’d rather jump in the code and try right away. I get that. After you get up to date as to what is gRPC on .NET Core, we’re getting right into how to integrate with gRPC services. Straight to the code.

MVC

Updated article about testing controller logic. Finally, there were some docs missing about Tag Helpers. This is now a solved problem. See below.

SignalR

We were missing a page about what feature each of our client supports. Check out the brand new page below. Then, since SignalR has dropped UseSignalR() everywhere and you now need to use UseEndpoints(...), all of our docs now accurately represent how to set this up.

WebAPI

After releasing the Microsoft.dotnet-openapi global tool, it is important to have documentation for it. That’s in the first article. A new article on customizing your error handling with ASP.NET Core Web API is definitely a must-read as well.

For the rest, you will find here updated samples, and general tidying of articles (typos, more snippets, clarifications).

Host and Deploy

Tons of updates on hosting with the new release of 3.0 in GA. With the release of Blazor Server-Side, this documentation also needed major updates. If you are using Blazor today, make sure to read this to avoid problems in the future. Health checks now get wrapped under UseEndpoints which required its documentation to be changed as well.

Performance

Updated package names and new snippets.

Razor Pages

The introduction has been completely rewritten with new code snippets for 3.0. Worth taking the time to refresh your knowledge on Razor Pages.

Security

Updated for UseEndpoints() as well as including new API updates for 3.0. Updated documentation troubleshoot certification update.

Tests

NuGet

Reference

.NET/ASP.NET Documentation Update for August 2019

tldr; This is a status update on the .NET documentation. If you want me to do more of those (once a month), please let me know in the comments!

NOTE: .NET Core 3.0 will be released at .NET Conf. That starts on September 23rd 2019. The conference is online and you’ll be able to ask questions. Please consider attending!

Hi everyone!

This is the third month where I post a summary of all .NET-related documentation that were significantly updated during the month of August.

My name is Maxime Rouiller and I’m a Cloud Advocate with Microsoft. For this month, I’m covering three major products:

Obviously, that’s a lot of changes and I’m to help you find the gold within this tsunami of changes.

So here are all the documentation updates by product with commentary when available!

Themes this month

  • What’s new for the Preview 8
  • Updating the CLI documentation
  • Adding new tab on the hub to better find e-books
  • Removing duplicate articles
  • Updating C# 8:
    • Nullable types
    • Default interface
    • Reference page

.NET Core

There was this addition that was made this month:

Another VERY interesting article that was updated this month is a guidance article on cross-platform targeting! Now with more code sample!

The telemetry article has been thoroughly revised and now includes a link for you to see the telemetry data for the past quarter (Q2):

The .NET Standard support table was updated to include the 2.1 Preview information:

Dependency Loading

All of the following are brand new .NET Core articles:

Diagnostics

Brand new articles on the available diagnostic tools within .NET Core. From managed debuggers, logging, tracing, and unit testing:

ML.NET

New tutorial for developing an ONNX model to detect objects in images:

Articles on Model Builder and ML.NET CLI are now in the main table of contents under Tools sections:

There was a small but important bug fix to the ML.NET CLI telemetry article to fix the environment variable name to opt out of telemetry:

.NET for Apache Spark

A new tutorial was added based on a customer suggestion:

.NET APIs

.NET Core 3.0 Preview 8 was launched on August 14th, so the API reference documentation for .NET Core and .NET Platform Extensions 3.0 was updated. The API documentation was also updated to include a new version of .NET Standard 2.1 Preview.
The documentation team is also working closely with the .NET developer team to add more API documentation for .NET Core 3.0. We reduced the number of undocumented APIs by 1,336 in August.

Do you want to watch what’s going on? Follow the .NET APIs Docs repository!

ASP.NET Core

Fundamentals

Performance

Security

gRPC

SignalR

Blazor

Do I need to mention that those are all must reads?

Razor Pages

Razor Pages with EF Core in ASP.NET Core Tutorial

This whole tutorial was updated to 3.0 and got good changes to review. Worth going through again!

Tutorials, HowTo, guides, and others

Two brand new tutorials this month.

All the following tutorials were updated to .NET Core 3.0.

NuGet

.NET/ASP.NET Documentation Update for July 2019

tldr; This is a status update on the .NET documentation. If you want me to do more of those (once a month), please let me know in the comments!

Hi everyone!

If you missed our first post for June, well today I’m posting a summary of all .NET related documentation that were updated significantly during the month of July.

My name is Maxime Rouiller and I’m a Cloud Advocate with Microsoft. For the month of July, I’m covering 3 major products.

  • .NET, which had ~248 commits, and 3,331 changed files on their docs repository
  • ASP.NET, which had ~190 commits, and 1,413 changed files on their docs repository
  • NuGet, which had ~126 commits, and 133 changed files on their docs repository

Obviously, that’s a lot of changes and I’m to help you find the gold within this tsunami of changes.

So here are all the documentation updates by product with commentary when available!

.NET Core

There were lots of consolidation in the documentation happening. Content that was specific to the .NET Framework documentation that also applies to the .NET Core documentation are being moved to the .NET Guide. Things like Native Interop (say hi to COM), the C# Language Reference

.NET Architecture

The .NET Architecture e-books content was mixed in with the fundamentals content under the .NET Guide. The team wanted to give a better home for those, so a new landing page was created.

.NET Application Architecture Guidance

Native Interop

Csharp

VB.NET

There were tons of documentation that needed examples. Here are a few. To change the language to VB, make sure you pick your favorite language on the language selector at the top of the page left of the “Feedback” button.

Tutorials, recommendations, and others

This .NET CLI tutorial was rewritten and went from one page to three.


.NET APIs

.NET Core 3.0 Preview 7 was launched on July 23rd, so the API reference documentation for .NET Core and .NET Platform Extensions 3.0 was updated.
The documentation team is also working closing with the .NET developer team to add more API documentation for .NET Core 3.0. We reduced the number of undocumented APIs by 1,374 in July and this effort will continue through the month of August.

ASP.NET Core

gRPC

Documentation keeps improving on gRPC. This time, it’s security focused.

Troubleshooting

This doc was consolidated from other pages that handled errors and how to troubleshoot.

Blazor

Security (Authentication/Authorization/etc.)

Authentication without Identity providers tutorial. Very interesting read!

Those pages received significant changes.

MVC / WebAPI

New features in 3.0 that allows you to use HTTP REPL directly from the CLI.

Fundamentals

This CLI global tool is used to help you create areas, controllers, views, etc. for your ASP.NET Core applications. Especially useful if you want to create your own. For the source, look no further than on GitHub.

The following are pages that received significant changes.

Host and Deploy

SignalR

Performance

This article was co-written with /u/stevejgordon! Have you heard about ObjectPool? It prevents objects to be garbage collected and reused instead. It’s been in .NET Core forever but this article was written with performance in mind.

Tutorials

New tutorial for ASP.NET Core 3.0 Preview this time with jQuery.

Those Razor Pages tutorials received significant changes due in part to the latest Preview.

2 more tutorials to receive significant changes are focused on Web API and SignalR

NuGet

Including the 5.2 release notes, there’ new pages that has been created within the last month. Take a look to stay up to date!

A few of significantly modified pages includes handling nuget accounts, and Package Restore.

Using EasyAuth (AppService Authentication) with ASP.NET Core

There’s this cool feature in Azure AppService that I love. It’s called EasyAuth although it may not use that name anymore.

When you are creating a project and want to throw in some quick authentication Single-Sign-On (SSO for short) is a great way to throw the authentication problem at someone else while you keep on working on delivering value.

Of course, you can get a clear understanding of how it works, but I think I can summarize quite quickly.

EasyAuth works by intercepting the authentication requests (/.auth/*) or when authenticated, fills in the user context within your application. That’s the 5-second pitch.

Now, the .NET Framework application lifecycle allowed tons of stuff to happen when you added an HttpModule in your application. You had access to everything and the kitchen sink.

.NET Core, on the other hand, removed the concept of all-powerful modules and instead introduced Middlewares. Instead of relying on a fixed set of events happening in a pipeline, we could expand the pipeline as our application needed it.

I’m not going to go into details on how to port HttpModules and Handlers but let’s assume that they are widely different.

One of the many differences is that HttpModules could be set within a web.config file and that config file could be defined at the machine level. That is not possible with Middlewares. At least, not yet.

Why does it matter?

So with all those changes, why did it matter for EasyAuth? Well, the application programming model changed quite a lot, and the things that worked with the .NET Framework stopped working with .NET Core.

I’m sure there’s a solution on the way from Microsoft but a client I met encountered the problem, and I wanted to solve the problem.

Solving the issue

So, after understanding how EasyAuth worked, I’ve set on to create a repository as well as a NuGet package.

What I was fixed to do was relay the captured identity and claims into the .NET Core authentication pipeline. I’m not doing anything else.

Installing the solution

The first step is to install the NuGet package using your method of choice. Then, adding an [Authorize(AuthenticationSchemes = "EasyAuth")] to your controller.

Finally, adding the following lines of code to your Startup.cs file.

1
2
3
4
5
6
7
using MaximeRouiller.Azure.AppService.EasyAuth
// ...
public void ConfigureServices(IServiceCollection services)
{

//... rest of the file
services.AddAuthentication().AddEasyAuthAuthentication((o) => { });
}

That’s it. If your controller has an [Authorize] attribute, the credentials are going to automatically start populating the User.Identity of your MVC controller.

Question

Should I go farther? Would you like to see this integrated within a supported Microsoft package? Reach out to me directly on Twitter or the many other ways available.

Solving Cold-Start disturbs serverless' definition and it's okay

When you look at Azure Functions, you see it as a great way to achieve elastic scaling of your application. You only pay for what you use, you have a free quota, and they allow you to build entire applications on this model.

The whole reason why Azure Functions is free is due to its linked plan. It’s called Consumption Plan. While Azure Functions is an application model, the consumption plan is where the serverless kicks in. You give us your application, and you care less about the servers.

One of the main selling points of serverless is the ability to scale to 0. It allows you to pay only for what you use and it’s a win-win for everyone involved.

That would look a little bit like the image below.

Ideal Scale Behavior

About Cold Starts

Cold start happens when an application loads for the first time on a server. What happens behind the scene look as follows.

  1. The cloud receives a request for your application and starts allocating a server for it
  2. The server downloads your application
  3. The cloud forwards the request received initially to your application
  4. The application stacks load up and initialize what it needs to run the code successfully
  5. Your application loads up and starts handling the request.

This workflow happens every time your application either goes from 0 to 1 or when the cloud scales you out.

This whole process is essential as Azure can’t keep the servers running all the time without blocking other applications from running on the same servers.

That time between when the request initially arrives and is handled by a server can be longer than 500ms. What if it takes a few seconds? What do you do to solve that problem?

Scale with cold start

Premium Functions

Azure Premium Functions is the best way to resolve that problem. It breaks the definition of Serverless by the fact that you can’t scale to 0. It does, however, offer the elastic scale-out that is required to handle a massive amount of load.

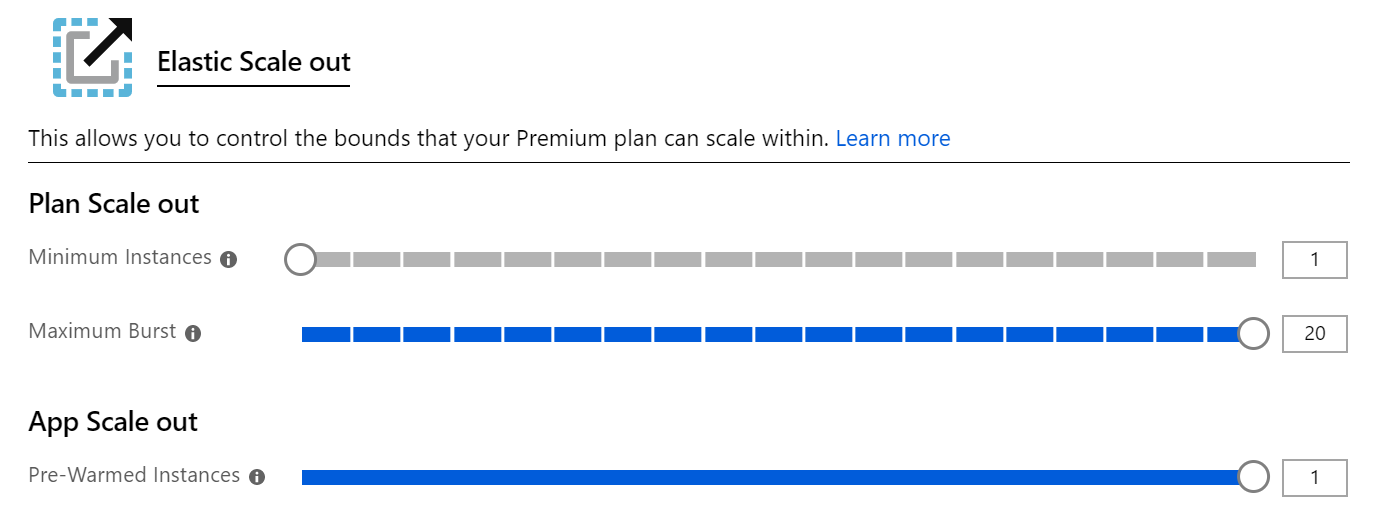
Elastic Scale-Out

This minimum of one instance is what makes a night and day difference in terms of improving performance. This single instance already has your application on it; the Azure Functions runtime is ready to handle your application.

Having a permanent instance removes most of the longer steps needed to handle a request. It effectively removes cold-start issues as seen below.

Scale with One Pre-Warmed Instance

When would you use Premium Functions? When your application can’t have cold-starts. Not every application require the need for this feature, and I wholeheartedly agree. Keep on using the Consumption Plan if it fits your needs, and the cold-start isn’t a problem.

If you are among the clients that can’t afford to have cold-start time in your application while still needing the bursting of servers, Premium Function is for you.

Resources

I’ve gone very quickly over the essential feature that I think fixes one of the more significant problems with serverless. More features come with Premium Functions. I’ve left a link to the docs in case you want to read it all by yourself.

Getting rid of Time Zone issues within Azure Functions

Your client wants to run a database clean up task every day at 2 am. Why? Mostly because it’s when there’s no traffic on the site and it reduces the amount of risk of someone encountering problems due to maintenance tasks.

Sounds good! So as an engineer, you know that task is periodic and you don’t need to create a Virtual Machine to handle this task. Not even an AppService is required. You can go serverless and benefit from those free million monthly executions that they offer! Wow. Free maintenance tasks!

You create a new Function app, write some code that looks something like this.

1
2
3
4
5
[FunctionName("DatabaseCleanUpFunction")]
public static void Run([TimerTrigger("0 0 2 * * *")]TimerInfo myTimer, ILogger log)
{

// todo: clean up the database
}

Wow! That was easy! You publish this application to the cloud, test it out manually a few times maybe then publish it to production and head back home.

When you get back to the office the next day, you realize that the job has run yes… but at 10 pm. Not 2 am. What happened!?

You’ve been struck by Time Zones. Oh, that smooth criminal of time.

Default time zone

The default timezone for Azure Functions is UTC. Since I’m in the Eastern Time Zone, this previous function now runs at 10 pm instead of 2 am. If there were users that were using my application at that time, I could have severely impacted them.

That is not good.

The Fix

There are two ways to go around this. One, we change our trigger’s CRON Expression to represent the time in UTC and keep our documentation updated.

The second way is to tell Azure Functions in which timezone they should interpret the CRON Expression.

For me, a man of the best Coast, it involves setting the WEBSITE_TIME_ZONE environment variable to Eastern Standard Time. If you are on the lesser Coast, you may need to set yours to Pacific Standard Time.

However, let’s be honest. We’re in a global world. You need The List™.

Find your region on that list, set it in the WEBSITE_TIME_ZONE, and Azure Function automatically set the correct Time Zone for your CRON expression.

Fixing Azure Functions and Azure Storage Emulator 5.8 issue

So you’ve updated Azure Functions to the latest version (2.X at the time of writing this), and nothing starts anymore.

Now, when you boot the Functions host, you get this weird error.

1
[TIMESTAMP] A host error has occurred
[TIMESTAMP] Microsoft.WindowsAzure.Storage: Server encountered an internal error. Please try again after some time.

There happen to be an issue opened on GitHub that relates to Durable Functions and Azure Storage Emulator.

The thing is, it’s not directly related to Azure Durable Functions. It’s related, in my opinion, in a breaking change that happened in Azure Storage Emulator 5.8 ways of responding from its API.

If you want to fix that issue, merge the following setting in your local.settings.json file.

1
2
3
4
5
{
"Values": {
"AzureWebJobsSecretStorageType": "files"
}

}

This only applies when "AzureWebJobsStorage": "UseDevelopmentStorage=true".

So why should we set that? There was a change that was introduced back in September 2018 when Azure Functions V2 was released. Azure Functions store your secret on disk before 2.0. Azure Functions, when slot swapping environments, swap the content of the disk including the secrets.

What this setting does is ensure that Functions stores secrets on your file system by default. It’s expected behavior when using a local development environment.

If you want to read more, there is an entire article on that behavior.

Conclusion

To fix the issue, you can either use the workaround or update the Azure Storage Emulator to 5.9.

Wrapping Node.js Azure Table Storage API to enable async/await

I love the latest and greatest. Writing code by using the new language syntax is fantastic.

What happens when your favorite library doesn’t? You are stuck trying to find a workaround. We all hate workarounds, but they are the glue that keeps our code together at the end of the day.

Between the runtime, the frameworks, the libraries, and everything else… we need everyone on the same page.

Recently, I had to use Azure Node.js Table Storage API.

First, let me say I know. Yes, there is a v10 that exist, and this is the v2. No, v10 doesn’t support Table Storage yet. So, let’s move on.

Here’s the code I wanted to see:

1
2
3
4
5
6
7
8
9
let storage = require('azure-storage');
// ...

async function getAllFromTable() {
let tableService = storage.createTableService(connectionString);
let query = new storage.TableQuery()
.where('PartitionKey eq ?', defaultPartitionKey);
return await queryEntities(tableService, 'TableName', query, null);
}

Here’s the code that I had:

1
2
3
4
5
6
7
8
9
10
11
12
13
14
15
async function getAllFromTable() {
return new Promise((resolve, reject) => {
let tableService = storage.createTableService(connectionString);
let query = new storage.TableQuery()
.where('PartitionKey eq ?', defaultPartitionKey);

tableService.queryEntities('TableName', query, null, function (err, result) {
if (err) {
reject(err);
} else {
resolve(result);
}
});
});
}

The sight of function callbacks gave me flashbacks to a time where code indentation warranted wider monitors.

The workaround

Here’s the temporary workaround that I have for now. It allows me to wrap highly used functions into something more straightforward.

1
2
3
4
5
6
7
8
9
10
11
12
13
async function queryEntities(tableService, ...args) {
return new Promise((resolve, reject) => {
let promiseHandling = (err, result) => {
if (err) {
reject(err);
} else {
resolve(result);
}
};
args.push(promiseHandling);
tableService.queryEntities.apply(tableService, args);
});
};

Overview of the workaround

  1. We’re using async everywhere
  2. Using Rest parameters args allow us to trap all parameters from that API
  3. We’re wrapping the proper promise and inserting it into the arguments
  4. We’re calling the relevant API with the proper argument.

Conclusion

That’s it. While the Node.js Storage v10 is having table storage implemented, I recommend wrapping table storage code into a similar structure.

This will allow you to use the new language syntax while they update the library.

How to build a multistage Dockerfile for SPA and static sites

When you are a consultant, your goal is to think about the best way to save money for your client. They are not paying us because we can code. They are paying because we can remove a few dollars (or a few hundred) from their bills.

One of the situations we often find ourselves in is building a single page application (SPA). Clients want dynamically driven applications that don’t refresh the whole page, and a SPA is often the perfect choice for them. Among the many tools used to build a SPA, we find Angular, Vue, and React.

I’ve found that delivering websites with containers is a universal way of ensuring compatibility across environments, cloud or not. It also prevents a developer’s environment from having to install 25 different tools/languages/SDKs.

It keeps thing concise and efficient.

If you want to know more about Docker containers, take a few minutes, in particular, to read about the terminology.

The problem is that we only need Node.js to build that application, not to run it. So, how would containers solve our problem? There’s a concept in Docker called Multistage builds where you can separate the build process from the execution.

Here’s a template you can use to build a SPA with Node.js.

Dockerfile template for Node.js

1
2
3
4
5
6
7
8
9
10
11
12
13
#build stage for a Node.js application
FROM node:lts-alpine as build-stage
WORKDIR /app
COPY package*.json ./
RUN npm install
COPY . .
RUN npm run build

#production stage
FROM nginx:stable-alpine as production-stage
COPY --from=build-stage /app/dist /usr/share/nginx/html
EXPOSE 80

CMD ["nginx", "-g", "daemon off;"]

There’s a lot to unpack here. Let’s look at the two stages separately.

Build Stage (Node.js)

Multistage docker builds allow us to split our container in two ways. Let’s look at the build stage.

The first line is a classic. We’re starting from an Alpine image that has Node.js pre-installed on it.

Note: Alpine Linux is a security-oriented, lightweight Linux distribution based on musl libc and busybox. Its main characteristic is it runs everywhere and is extremely small, around 5MB.

We’re configuring /app as the working directory. Then, we do something unusual. We copy our package*.json files before copying everything else.

Why? Each line in a Dockerfile represents a layer. When building a layer, if a layer already exists locally, is retrieved from the cache instead of being rebuilt. By copying and installing our packages in a separate step, we avoid running npm install on dependencies that didn’t change in the first place. Since npm install can take a while to install, we save some time there.

Finally, we copy the rest of our app and run the npm build task. If your application doesn’t have a build task, change the name to whatever tasks generate an output folder like dist.

The result? We have a correctly built Node.js application located in /app/dist.

Production Stage

We’ve generated our SPA or static site with Node.js but… our application isn’t using Node.js. It’s using HTML/CSS/JS. We don’t need a Node.js image to take our application to production. Instead, we only need an HTTP server. Let’s use the NGINX Docker Image as a host.

We copy the output from our previously defined build-stage /app/dist folder into the NGINX defined folder /usr/share/nginx/html as mentioned in their docs.

After exposing port 80, we need to run NGINX with the daemon off; option to have it run in the foreground and preventing the container from closing.

Building the Dockerfile

This step is easy. Run the following command in the folder containing the Dockerfile.

1
docker build -t mydockerapp:latest .

Running the Docker container locally

Running the application on your machine is of course just a simple command away.

1
docker run -it -p 8080:80 mydockerapp:latest

This command is doing two things. First, it runs the container in interactive mode with the -i flag. That flag will allow us to see the output of NGINX as it runs. Second, it maps port 8080 of your local machine to port 80 of the container.

Opening your browser to http://localhost:8080 will show you your website.

Conclusion

I’m using Docker more and more for everything. I’m building applications that are single use with current technology. Docker empowers me in running applications with older versions of frameworks, runtime, languages, without causing tooling versioning issue with my machine.

While technology may continue to evolve, I’m never afraid that my Docker container won’t work anymore. Things have been stuck in time if only for a moment.

That means I don’t have to upgrade that AngularJS 1.X app to stay cool. If it works, it works.

Are you using Docker in unusual ways? Share them with me on Twitter!

Uploadings files to Storage in batches, two ways

I love static sites. They are cheap, easy to maintain, and are total non-issue in terms of security.

What? You hacked my site? Let me delete everything, reupload my files, and… we’re done. Okay… not totally true but you get the point.

Having the source of truth away from your deployment is a big relief. Your deployment having no possible actions on your source of truth is even better.

Okay, where am I going with this? Maybe you saw the announcement a few days ago that Static Sites on Azure Storage went General Availability (internally, we call this GA because we love acronyms).

Now let me tell you something else that you may not have picked up that I consider GA (Greatly Amazing).

Uploading files to Storage

Uploading files to storage is an operation that be done in many ways. Maybe you go through the portal and upload your files one by one. I don’t know about you, but, I got things to do. I can’t spend the day uploading my site like this. So we need alternatives.

Command line Interface (CLI, another acronym)

So how do I get you, dear reader, to be able to upload it from anywhere in the world including your phone. Why? No time to explain. We’re more interested in the HOW?

1
az storage blob upload-batch -d MyContainer --account-name MyStorageAccount -s ./generated/ --pattern *.html --if-unmodified-since 2018-08-27T20:51Z

Want to customize it a little? Check out the docs. It’s easy. It’s amazing. It works in Azure Cloud Shell.

Graphical User Interface (GUI, see? we love them)

You know what I think is even better in demos? A nice graphical interface. No, I’m not about to recommend you install Visual Studio 2019 to edit some markdown files and publish to Azure Storage. May look fun but… it’s still Windows only. I want you to be able to do that operation everywhere.

Let’s take something cross platform. Let’s take something that isn’t as polarizing. Let’s take an IDE that’s built on Electron.

Let’s use Azure Storage Explorer. record scratch

Azure Storage Explorer

Download it. Install it. Open it. Login with your account.

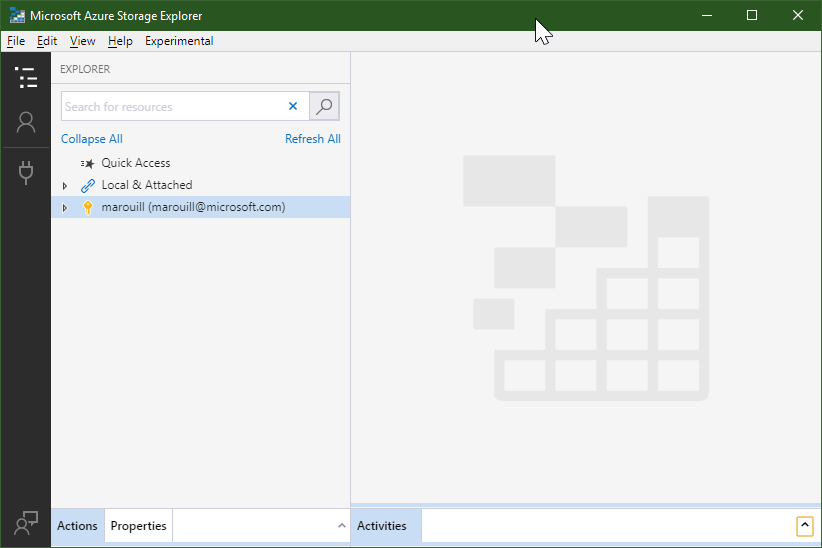
Bam. We’re here.

Image of Azure Storage Explorer initial state

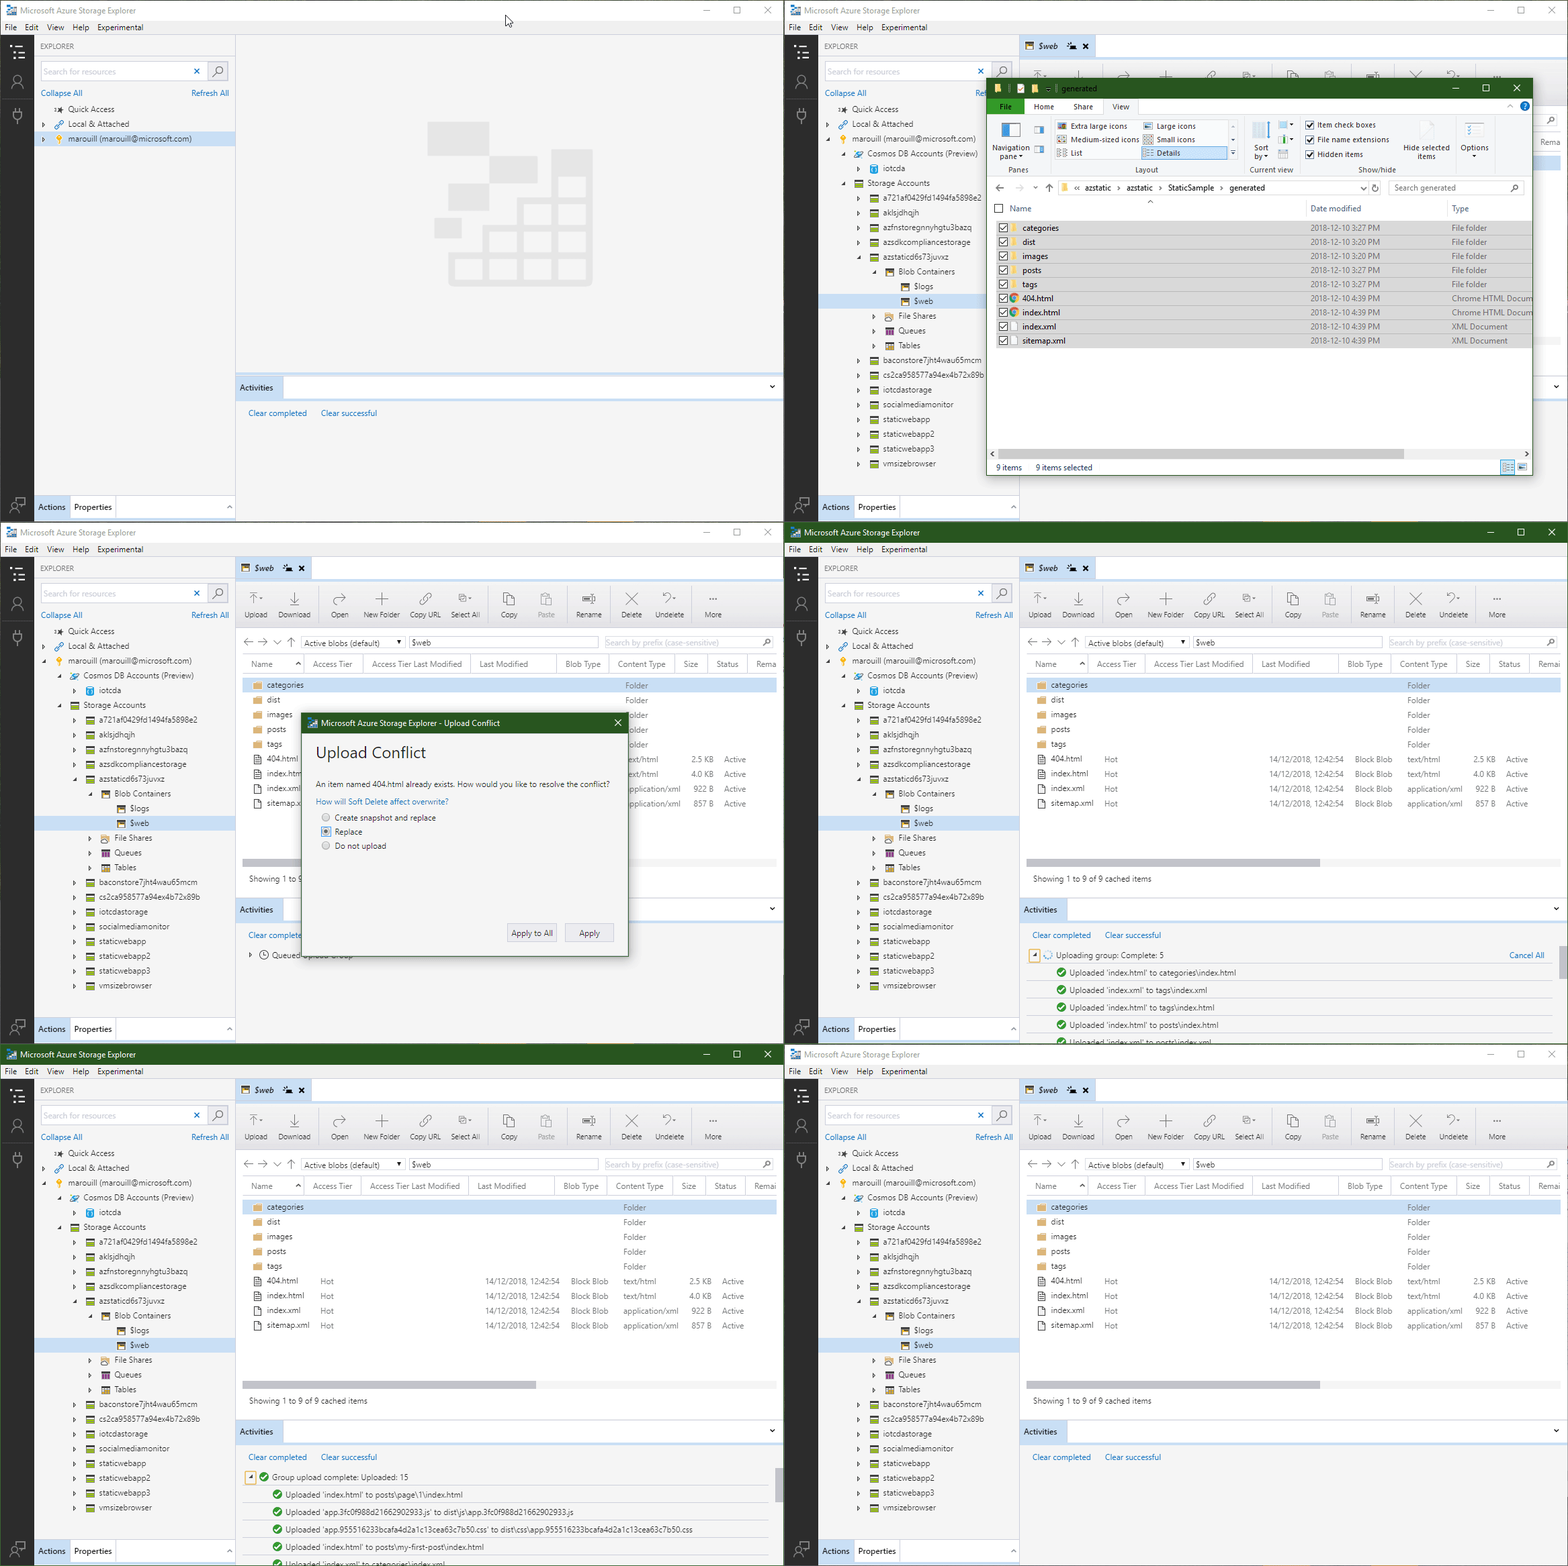
So how do I upload my blog to my storage account now? Well, someone told me once that an image is worth a thousand words.

An animated GIF is therefor priceless.

priceless animated gif

Did you see that? Drag and drop.

Getting started

So if you got yourself a static site using Azure Storage, I want you to know that whatever tools you’re using, this scenario works out of the box.

It is supported. You are in good hands. Do you have feedback on the Azure Static Site? Let me know on Twitter and we’ll talk.

Here’s a summary of all the links in this post.

Flipping the static site switch for Azure Blob Storage programmatically

As a few of you knows already, I REALLY love static sites.

So when I read the news that Azure Blob Storage enabled Static Site in Public Preview back in June, how would you classify my reaction?

via GIPHY

Right away, I wanted to automate this deployment. Then began my search into Azure Resource Management (ARM) templates. I search left and right and could not find an answer.

Where was this mysterious setting hiding?

Finding the switch

If the switch wasn’t in the ARM template, it must be somewhere else.

Since I tend to rush myself into coding, it’s the perfect moment to breathe and read. Let’s read the announcement once again:

This feature set is supported by the most recent releases of the Azure Portal, .Net Client Library (version 9.3.0), Java Client Library (version 8.0.0), Python Client Library (version 1.3.0), Node.js Client Library (version 2.10.0), Visual Studio Code Extension (version 0.4.0), and CLI 2.0 (extension version 0.1.3).

So, it’s possible to do it in code. On top of that, there are at least 6 versions of this code in multiple languages that set that property. Wow. Way to rush too fast into code Maxime (imagine slow claps here).

By going into the .NET Client Library’s GitHub, and searching for static website led me to those results.

The results may not look like much, but it mentions Service Properties. This is definitely not an ARM concept. Let’s do a quick search for azure storage service properties.

Where does it lead us? Just like every good Google search should lead. To the docs.

Wow. So I don’t even need to do a REST API or sacrifice a few gummy bears to get it?

Implementation

1
2
3
4
5
6
7
8
9
10
11

CloudStorageAccount storageAccount = CloudStorageAccount.Parse("<connectionString here>");
var blobClient = storageAccount.CreateCloudBlobClient();
ServiceProperties blobServiceProperties = new ServiceProperties();
blobServiceProperties.StaticWebsite = new StaticWebsiteProperties
{
Enabled = true,
IndexDocument = "index.html",
ErrorDocument404Path = "404.html"
};
await blobClient.SetServicePropertiesAsync(blobServiceProperties);

Just like that, the service is now enabled and able to serve HTTP request on a URL looking like this.

https://mystorageaccount.z00.web.core.windows.net/

Next post? Custom domain? Yay or nay?

More Resources

If you want to read more about how it works, I would recommend the following resources:

Prevent Kestrel from logging to Console in ASP.NET Core 2.2

I recently had the need to start a web server from the command line. Authentication, you see, is a complicated process and sometimes requires you to open a browser to complete that process.

Active Directory, requires you to have a Return Url which isn’t really possible from a command line. Or is it?

With .NET Core, you can easily setup a web server that listens to localhost. Active Directory, can be configured to redirect to localhost. Problem solved, right?

Not exactly. I’m partial to not outputing anything to useful when creating a CLI tool. I want kestrel to not output anything in the console. We have other ways to make an EXE talk, you see.

So how do you get Kestrel to go silent?

The first solution led me to change how I built my WebHost instance by adding .ConfigureLogging(...) and using Microsoft.Extensions.Logging. It is the perfect solution when you want to tell kestrel to not output anything from individual requests.

However, Kestrel will still output that it started a web server and on which ports it’s listening to. Let’s remove that too, shall we?

1
2
3
4
5
6
7
8
9
10
11
12
13
WebHost.CreateDefaultBuilder()
.SuppressStatusMessages(true) // <== this removes the "web server started on port XXXX" message
.ConfigureLogging((context, logging) =>
{
// this removes the logging from all providers (mostly console)
logging.ClearProviders();
//snip: providers where I want the logging to happen
})
.UseStartup<Startup>()
.UseKestrel(options =>
{
options.ListenLocalhost(Common.Port); // port that is hardcoded somewhere 🤷‍♂️
});

So next time you need Kestrel to take five, you know what to do. Add that SuppressStatusMessages

Step by step: Detecting files added between two commits in git

I was looking into retrieving the last created files into a repository. For me, it was for our Microsoft Azure Documentation.

This is, of course, completely open source and you can find the repository on GitHub. The problem however is that a ton of persons work on this and you want to know what are the new pages of docs that are created. It matters to me because it allow me to see what people are creating and what I should take a look into.

So, how do I retrieve the latest file automatically?

Knowing that git show HEAD shows you the latest commit on the current branch and git show HEAD~1 shows you the previous commit on the current branch, all we have to do is make a diff out of those two commits.

Showing changes between two commits

1
git diff HEAD HEAD~1

This however will show you in great details all the files that have been modified including their contents. Let’s trim it down a bit to only show names and status.

Showing names and status of files changed between two commits

1
git diff --name-status HEAD HEAD~1

Awesome! But now, ou should see the first column filled with a letter. Sometimes A, sometimes D but most often M. M is for modified, D for deleted and A for added. The last one is the one that I want.

Let’s add a filter on that too.

Showing names of files added between two commits

1
git diff --name-only --diff-filter=A HEAD HEAD~1

At that point, I changed --name-status to --name-only since now we are guaranteed to only have added files in our list and I don’t need the status column anymore. The thing however, is that I’m seeing png files as well as other types of files that I’m not interested in. How do I limit this to only markdown files?

Showing names of markdown files added between two commits

1
git diff --name-only --diff-filter=A HEAD HEAD~1 *.md

And that’s it. That’s how a simple command coupled with a few parameters can allow you total control of what you want out of git.

Resources

Here are the resources I used to build this command:

HttpRequestException with git pull from GitHub

I’m working on a Windows machine and some times ago, this error started happening when I did any git pull or git push operations.

1
fatal: HttpRequestException encountered.
   An error occurred while sending the request.
Already up-to-date.

Okay, we have an HttpException. First, let’s be clear that the whole concept of Exceptions do not exist in git. This is a .NET concept so it’s definitely coming from my Windows Credential Manager.

To enable tracing, you have to set the GCM_TRACE environment variable to 1.

1
SET GCM_TRACE=1
1
$env:GCM_TRACE = 1

Then, I did my git pull again.

1
C:\git\myrepo [master ≡]> git pull
08:59:28.015710 ...\Common.cs:524       trace: [Main] git-credential-manager (v1.12.0) 'get'
08:59:28.441707 ...\Where.cs:239        trace: [FindGitInstallations] found 1 Git installation(s).
08:59:28.459707 ...Configuration.cs:405 trace: [LoadGitConfiguration] git All config read, 27 entries.
08:59:28.466706 ...\Where.cs:239        trace: [FindGitInstallations] found 1 Git installation(s).
08:59:28.473711 ...Configuration.cs:405 trace: [LoadGitConfiguration] git All config read, 27 entries.
08:59:28.602709 ...\Common.cs:74        trace: [CreateAuthentication] detecting authority type for 'https://github.com/'.
08:59:28.684719 ...uthentication.cs:134 trace: [GetAuthentication] created GitHub authentication for 'https://github.com/'.
08:59:28.719709 ...\Common.cs:139       trace: [CreateAuthentication] authority for 'https://github.com/' is GitHub.
08:59:28.745709 ...seSecureStore.cs:134 trace: [ReadCredentials] credentials for 'git:https://github.com' read from store.
08:59:28.748709 ...uthentication.cs:163 trace: [GetCredentials] credentials for 'https://github.com/' found.
08:59:29.183239 ...\Program.cs:422      trace: [Run] System.Net.Http.HttpRequestException: An error occurred while sending the request. ---> System.Net.WebException: The request was aborted: Could not create SSL/TLS secure channel.
   at System.Net.HttpWebRequest.EndGetResponse(IAsyncResult asyncResult)
   at System.Net.Http.HttpClientHandler.GetResponseCallback(IAsyncResult ar)

<snip>

Now, we can see that we Could not create SSL/TLS secure channel. Also, we can see that my credential manager is version 1.12.0.

This tells me that something changed somewhere and that the version of my credential manager is probably not up to date. So time to head to the Windows Credential Manager Release Page.

Windows Credential Manager Release Page

Alright, so I’m a few versions behind. Let’s update to the latest version.

Now, let run another git pull.

1
C:\git\myrepo [master ≡]> git pull
Already up-to-date.

Alright so my problem is fixed!

Why?

Updating git credential manager to the latest version is definitely solving my problem but why did we have that problem in the first place?

If we look at release 1.14.0 we would see something very interesting among the release notes.

Added support for TLS 1.2 (as TLS 1.0 is being retired).

By doing a bit of search, I ended up on this blog post by GitHub Engineering which is a depreciation notice for TLS 1.0 since February 1st.

That’s it! Keep your tools updated folks!

Graph Databases 101 with Cosmos DB

Also available in a video format:

I’ve never played with any kind of Graph Database before this blog post. As a .NET Developer, this was weird. I’m so used to RDBMS like SQL Server that thinking in graph was difficult at first. Developers who uses it as their main tool also use a different kind of vocabulary. With RDBMS, we’re discussing tables, columns and joins. With graph, we’re more talking about vertices, properties, edges, and traversal.

Let’s get the vocabulary out of the way.

Graph Database Vocabulary

This is not exhaustive but only what we’re going to be discussing in this blog post.

Vertex (Verticies)

This is what I’ll also call a node. That’s what define an entity. RDBMS would have them represented as a table with a fixed schema. Graph databases doesn’t really have a fixed schema but they allow us to push documents.

Properties

So a vertex have properties just like a table have columns. Table have a fixed schema but graph databases are more like NoSQL Document databases with their more fluid schemas.

Edge

So up until now, we couldn’t make up the difference between a document and a graph database. Edges are what makes it so different. Edges define the relationship between two verticies.

So let’s take an example. A person is_friend with another person. We just defined an Edge called is_friend. That edge could also have properties like since. It would allow us to make queries on which persons in our database are friends since a specific date.

What about Cosmos DB?

With the vocabulary out, Cosmos DB allows us to create graph database really easily and make our first foray into it.

Creating a Cosmos DB Graph API

So to create my first Cosmos DB Graph database, I followed this tutorial.

For the Cosmos DB name, we’ll use beerpub, the resource group beerapp, and as for the API, we’ll use Gremlin (graph).

Then, using this other section of the quickstart, we’ll create a graph. For the database, we’ll use beerpub and for the graph ID we’re going to use beergraph.

We’ll want to keep the storage to 10Gb and the RU as low as possible since we’re just kicking the tires and wouldn’t want to receive a big invoice.

Creating our first project - Data Initializer

1
2
3
4
5
dotnet new console -n DataInitialization
cd DataInitialization
dotnet add package Gremlin.net
dotnet restore
code .

This will create us a basic console application from which we can initialize our data.

Let’s open up Program.cs and create some basic configuration that we’re going to use to connect to our Cosmos DB Graph API.

1
2
3
4
5
private static string hostname = "beerpub.gremlin.cosmosdb.azure.com";
private static int port = 443;
private static string authKey = "<Key>";
private static string database = "beerpub";
private static string collection = "beergraph";

Then, make sure the following usings are at the top of your Program.cs

1
2
3
4
5
using System;
using System.Threading.Tasks;
using Gremlin.Net;
using Gremlin.Net.Driver;
using Gremlin.Net.Structure.IO.GraphSON;

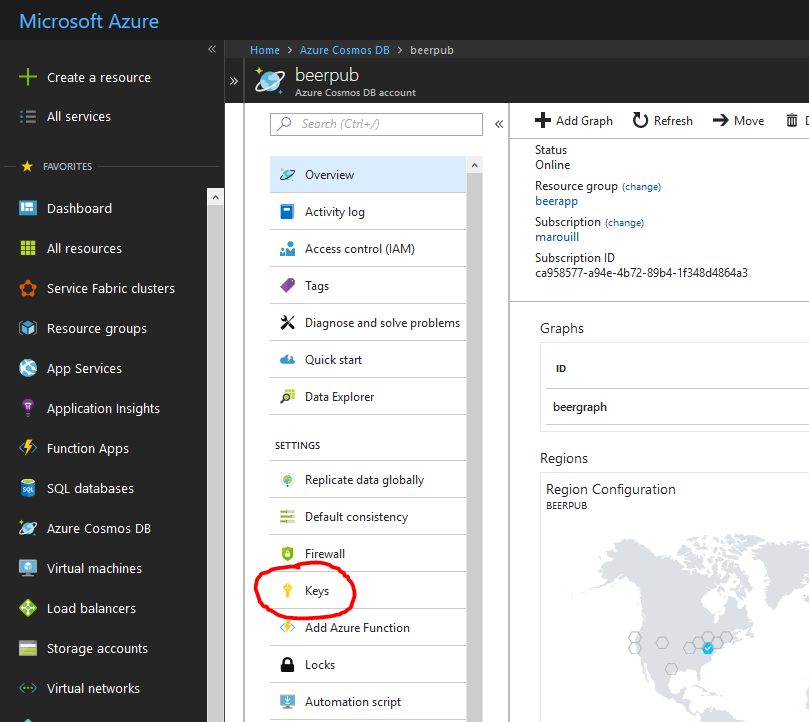
Your authKey will be found in your Azure Portal right here:

Location in the portal where we get our Cosmos DB Key

Or alternatively, you could run the following Azure CLI 2.0 command to retrieve both of them:

1
az cosmosdb list-keys -n beerpub -g beerapp

Finally, we need to enable support for async in our Main(...) and add the basic client initialization.

1
2
3
4
5
6
7
8
9
10
11
12
13
14
15
16
static void Main(string[] args)
{

Console.WriteLine("Starting data creation...");
Task.WaitAll(ExecuteAsync());
Console.WriteLine("Finished data creation.");
}

public static async Task ExecuteAsync()
{

var gremlinServer = new GremlinServer(hostname, port, enableSsl: true,
username: "/dbs/" + database + "/colls/" + collection, password: authKey);
using(var gremlinClient = new GremlinClient(gremlinServer, new GraphSON2Reader(), new GraphSON2Writer(), GremlinClient.GraphSON2MimeType))
{
//todo: add data to Cosmos DB
}
}

Our bootstrap is completed and we are now ready to go.

Since we’ll want to start from scratch, let’s use the Gremlin drop step to clear our whole graph before going further.

1
2
// cleans up everything
await gremlinClient.SubmitAsync<dynamic>("g.V().drop()");

Now we need to add beers and breweries. Those are represented as vertex (or Verticies). Vertex can have properties. Properties belong to that specific vertex. For our beers and breweries, we’d like to give them a proper name that will be easy to read instead of an id.

1
2
3
4
5
6
// add beers
await gremlinClient.SubmitAsync<dynamic>("g.addV('beer').property('id', 'super-a').property('name', 'Super A')");
await gremlinClient.SubmitAsync<dynamic>("g.addV('beer').property('id', 'nordet-ipa').property('name', 'Nordet IPA')");

// add breweries
await gremlinClient.SubmitAsync<dynamic>("g.addV('brewery').property('id', 'auval').property('name', 'Brasserie Auval Brewing')");

All those verticies are now all hanging around without any friends. They are single nodes without any connections or relationships to anything. Those are called edges in the graph world. To add an edge, it’s as simple as selecting a vertex (g.V('id of the vertex')), adding an edge (.addE('relationship description')) to another vertex (.to(g.V('id of the vertex'))).

1
2
3
// add 'madeBy'
await gremlinClient.SubmitAsync<dynamic>("g.V('super-a').addE('madeBy').to(g.V('auval'))");
await gremlinClient.SubmitAsync<dynamic>("g.V('nordet-ipa').addE('madeBy').to(g.V('auval'))");

If we run that code as-is, we should have the following show up in our Azure Cosmos DB Data Explorer.

Image of the represented graph

Conclusion

So this was my first beer database coming directly from an import code. Do you want to see more?

Let me know if these kinds of demos are interesting and I’ll be sure to do a follow-up!

Calculating Cosmos DB Request Units (RU) for CRUD and Queries

Video version also available

Cosmos DB is a globally distributed database that offers single-digit-millisecond latencies on multiple models. That’s a lot of power under the hood. As you may be tempted to use as much of it as possible, you have to remember that you are billed for what you use.

Cosmos DB they measure your actual usage of the service on Request Units (RU).

What are Cosmos DB Request Units (RU)?

Request units are a normalized number that represents the amount of computing power (read: CPU) required to serve the request. Inserting new documents? Inexpensive. Making a query that sums up a field based on an unindexed field? Ccostly.

By going to the Cosmos DB Capacity Planner tool, we can test from a JSON sample document how many RUs are required based on your estimated usage. By uploading a simple document and setting all input values to 1 (create, read, update, delete) we can see which operations are relatively more expensive than others.

1
Create RUs:  5.71
  Read RUs:  1.00
Update RUs: 10.67
Delete RUs:  5.71

Those are the number at the time of writing this blog post and may change in the future. Read is for a single document. Queries work differently.

Tracking Request Unit (RU) usage

Most operation with the DocumentClient (SQL API) will return you a model that will allow you to see how much RU we use. Here are the four basic operations and how easy it is to retrieve their respective Request Unit.

Create

To retrieve the amount of Request Unit used for creating a document, we can retrieve it like this.

1
2
3
var collectionUri = UriFactory.CreateDocumentCollectionUri(database.Id, documentCollection.Id);
var result = await client.CreateDocumentAsync(collectionUri, new { id = "1", name = "John"});
Console.WriteLine($"RU used: {result.RequestCharge}");

Update

We can also retrieve it while updating a document.

1
2
3
var document = new { id = "1", name = "Paul"};
var result = await client.ReplaceDocumentAsync(UriFactory.CreateDocumentUri(database.Id, documentCollection.Id, document.id), document);
Console.WriteLine($"RU used: {result.RequestCharge}");

Delete

Finally, figuring out the amount of RU used for deleting a document can be done like so.

1
2
var result = await client.DeleteDocumentAsync(UriFactory.CreateDocumentUri(database.Id, documentCollection.Id, "1"));
Console.WriteLine($"RU used: {result.RequestCharge}");

This is quite easy. Right? Let’s go onto Queries.

Calculating the Request Unit (RU) of Cosmos DB Queries

That’s where things get a little more complicated. Let’s build a query that returns the top 5 documents and retrieve the results. The default API usage makes it very easy for us to retrieve a list of elements but not the Request Units.

1
2
3
4
var documentQuery = client.CreateDocumentQuery(collectionUri).Take(5);

// materialize the list.. but we lose the RU
var documents = documentQuery.ToList();

Here’s why it’s difficult to retrieve the RU in this scenario. If I do a ToList, it will return a generic list (List<T>) on which I can’t append more properties. So, we lose the Request Units while retrieving the documents.

Let’s fix this by rewriting this query.

1
2
3
4
5
6
7
8
9
10
var documentQuery = client.CreateDocumentQuery(collectionUri).Take(5).AsDocumentQuery();

double totalRU = 0;
List<dynamic> allDocuments = new List<dynamic>();
while (documentQuery.HasMoreResults)
{
var queryResult = await documentQuery.ExecuteNextAsync();
totalRU += queryResult.RequestCharge;
allDocuments.AddRange(queryResult.ToList());
}

If all you wanted was the code, what’s above will do the trick for you. If you want to understand what happens, stick around.

The explanation

Cosmos DB will never return 1 million rows to you in one response. It will page it. It’s why we see a pattern similar to an Enumerator.

The first thing we do is move the query from an IQueryable to an IDocumentQuery. Using this method enables us to access the ExecuteNextAsync method and the HasMoreResults property. With just those two, we can now get a separate FeedResponse<T> for each page of our query. It’s now obvious that if you try to extract all the data from a collection, you are using RUs for each page of result.

Next Steps

Want to give it a try? Never tried Cosmos DB before?

You can get 7 day of free, no credit card, no subscription access, and no questions asked.

Then, once you have a free database, try one of the 5 minutes quickstart in the language that you want.

Need more help? Ask me on Twitter. I’ll be happy to help!

Converting an Azure Table Storage application to Cosmos DB with Table API

Converting an application that is using Azure Table Storage to Cosmos DB is actually pretty easy to do.

Azure Table Storage is one of the oldest Microsoft Azure storage technology7 out there and lots of applications still uses it. But, what if you need to go global and have your data accessed in a performant way with better SLAs that are guaranteed by the standard Storage Account SLAs?

Cosmos DB allows you to effortlessly transition from one to the other by one single change in your code.

Previous Code

Here’s how we would normally build a Azure Storage Client.

1
2
3
4
5
6
7
8
private async Task<CloudTable> GetCloudTableAsync()
{

CloudStorageAccount storageAccount = CloudStorageAccount.Parse(configuration.GetConnectionString("initial"));
var tableClient = storageAccount.CreateCloudTableClient();
CloudTable table = tableClient.GetTableReference("mytable");
await table.CreateIfNotExistsAsync();
return table;
}

Whereas initial connection string is represented as this:

1
DefaultEndpointsProtocol=https;AccountName=<ACCOUNT NAME>;AccountKey=<KEY>;EndpointSuffix=core.windows.net

Cosmos DB Code

Here’s how we would create the new CloudTable when using Cosmos DB.

1
2
3
4
5
6
7
8
private async Task<CloudTable> GetCloudTableAsync()
{

CloudStorageAccount storageAccount = CloudStorageAccount.Parse(configuration.GetConnectionString("destination"));
var tableClient = storageAccount.CreateCloudTableClient();
CloudTable table = tableClient.GetTableReference("mytable");
await table.CreateIfNotExistsAsync();
return table;
}

Whereas destination connection is represented as this:

1
DefaultEndpointsProtocol=https;AccountName=<ACCOUNT NAME>;AccountKey=<KEY>;TableEndpoint=https://MYCOSMOS.table.cosmosdb.azure.com:443/;

Difference in your code

And that’s it. A single connection string change and you’ve gone from the good ol’ Table Storage to multiple consitency levels, to globally replicated data in multiple regions.

Difference in implementation

Of course, we went from 2 different implementations from 1 single API. There’s bound to be differences. The complete list goes in details but it will end up being more expensive as Cosmos DB will preallocate your storage while your Storage Account will only allocate what you use. As much as it will end up being more expensive on Cosmos DB, you will also end up with better performance.

Try it now

If you want to try Cosmos DB, there’s multiple ways.

If you don’t have an account or a credit-card, you can try it for free right here.

If you want to not be limited by the subscribtion-less option, you can always get an Azure Free Trial which includes free credits for Cosmos DB.